")


Have you ever found yourself belting out your heart into a microphone, only to listen back to the recording and find it sounds like you’re singing through a tin can? That, my friend, is clipping. It’s the worst, amirite? We’ve actually had a string of badly distorted vocals come through our studio this month, so I think it’s about time we dive into this topic.
What is clipping?
Clipping is the distortion that occurs when an audio signal exceeds the maximum level that can be accurately recorded or reproduced. It’s a common issue in digital audio, leading to a loss of quality.
Clipping happens when the amplitude of an audio signal is too high for the recording system to handle. The system just can’t keep up with the signal and ends up chopping off the tops and bottoms of the waveform.
To better show an example of this and how you can identify this in your own recordings take a look of the pictures below. While the description isn’t HOW this happens it IS just how it’s represented in your daw and how you can identify it.
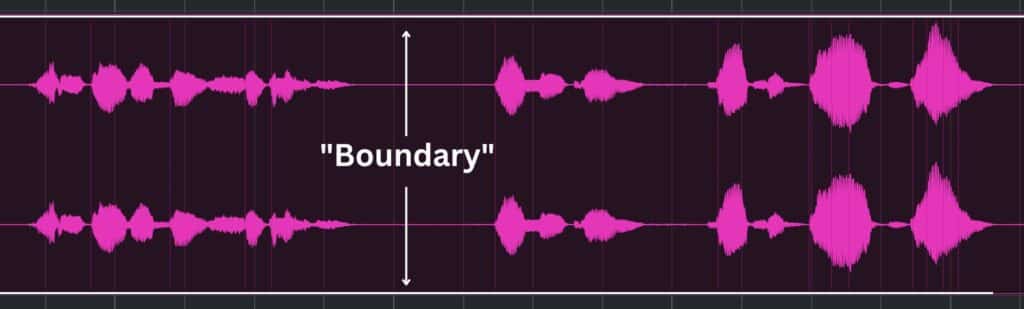
This is an Image of a normal properly gain staged vocal take. As you can notice on the far right, louder parts of the waveform do not exceed the “boundaries” (marked by white lines on the top and bottom) outside of the clip view. This is what your recordings SHOULD look like.
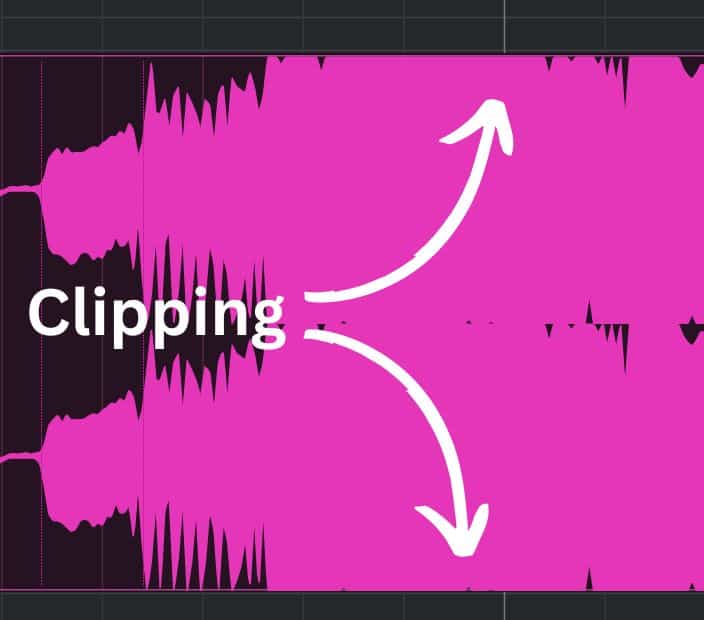
This next image is how your DAW will display your waveform if you were clipping. (If your DAW has a waveform zoom tool, make sure it is zoomed all the way out). As you notice the waveform hits the boundary the tops and bottoms of the waveform get clipped off. This is what your recordings SHOULDN’T look like.
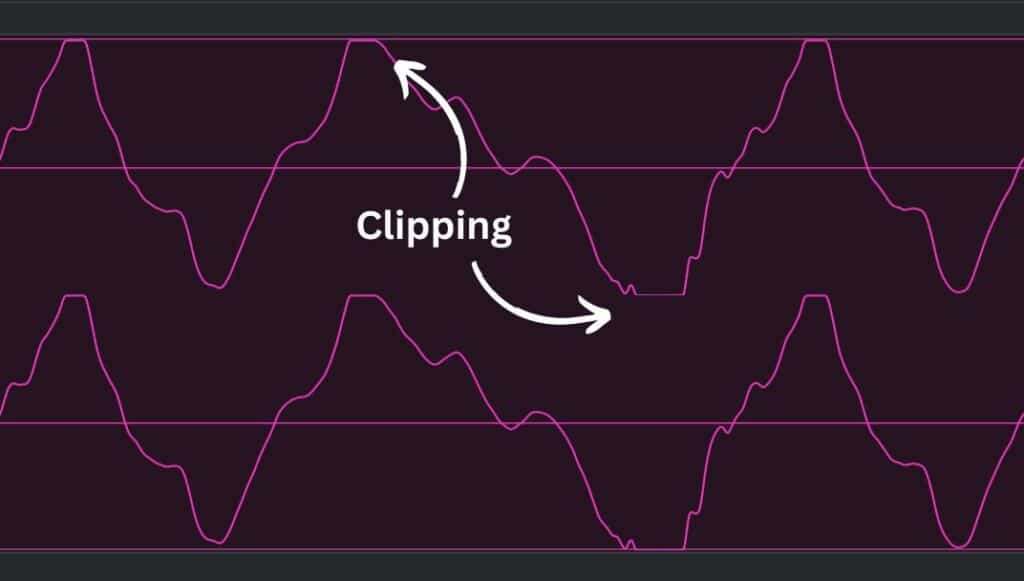
Now if we zoom in to take a closer look at the waveform you can see that the wave has been flattened out. those straight lines are a No No.
How Clipping Ruins Vocal Recordings
As you can see by the images when you go past the threshold of what your interface can handle, the information above and below gets cut, that’s right, it disappears. Having that data cut can be detrimental to the quality of the audio, resulting in unpleasant “Non-musical” distortion, and a reduction in clarity, air and warmth. Once a signal has been clipped, it’s challenging to mitigate the effect of the lost information, making it crucial to avoid clipping during the recording process.
Can Clipping Be Fixed?
Now, you might be thinking, “Can’t I just fix the clipping after the fact?” Well, there’s some good news and some bad news. The good news is that there are declipping tools out there that can help to some extent. The bad news? They can’t perform miracles.
Once a signal has been clipped, the information is lost, and there’s no real way to get it back. Clipping omits any information above and below the threshold. You can use Plugins like Izotope RX to TREAT clipped audio, but it cannot replace missing portions of the waveform.
It’s like trying to unscramble an egg by putting the egg back inside of it’s shell and gluing it together – ain’t gonna happen, buddy. So while de clipping tools can help to a degree, the best solution is to avoid clipping altogether.
How to Stop Vocals from Clipping
“The gain knob is not a volume knob!” – that’s right, I said it. Don’t be that guy who cranks up the gain like it’s going out of style. Instead, find the sweet spot where your vocals are loud enough to be heard but not so loud that they’re clipping. It’s a delicate balance, like walking a tightrope while juggling flaming swords. Okay, maybe not quite that dramatic, but you get the idea.
If you’re having trouble hearing your vocals in the mix ….. turn the mix down, it’s that easy. With today’s gear noise floors are almost non-existent, you can record at lower volumes and turn everything up later. Unless you’re in a less than optimal, noisy or untreated environment, recording quieter is better.
Here are a few tips to help you avoid clipping:
- Keep an eye on your levels: Most interfaces have meters that show you how close you are to clipping. If the meter is hitting the red, or you notice you’re consistently in the yellow during quieter parts, you’re in the danger zone, dial it back a bit.
- Adjust your gain: Use the gain control on your audio interface to find the perfect level for your vocals. Remember, the gain knob is not a volume knob! The ideal level is just tickling the yellow at the loudest parts of the song. And again, if you are having a hard time hearing your vocals in the mix …. turn the mix down!
- Record at a lower volume: If you have a well treated space where you don’t have to worry about reflections in the room/ reverb, and you don’t hear you PC fan or your AC unit, record at a lower volume, and just raise the gain inside of your DAW afterwards.
What to Do If Your Vocals Are Clipped
So, let’s say you didn’t follow any of the advice above, and your vocals are clipping. What do you do now?
You should re-record your vocals using proper gain staging to ensure the best quality vocals. While declipping plugins may help, they cannot replace the data that is lost when audio is clipped.
This is especially true when it’s the lead vocals, while bgvs and doubles can be tucked away a little more being since they are not prominent pieces, the lead vocal needs to be as clean as possible to ensure the best results. It’s your music, you should want to put your best foot forward. Take the time to re-record.
If you recorded in a studio and you notice your vocals are clipping, you need to ask for your money back, as this is recording 101, and they are definitely not doing a good job if that was the result.
The Difference Between Analog and Digital Clipping
Now you’ve probably heard that distortion is good going in, and yes it absolutely can be a sound you want! …. in analog chains……Let’s talk a bit about the difference between analog and digital clipping. You see, back in the day, clipping or “distortion” was often considered a pleasing sound in the analog world. Think of the warm, fuzzy tones of a guitar amp turned up to 11 – that’s analog distortion at its finest.
In the digital realm, however, it’s a whole different story. Analog-to-digital (A/D) converters don’t color the sound like their analog counterparts. Instead, they just omit information when they can’t handle the signal, leading to that awful, harsh distortion we’ve been discussing. It’s like the difference between a cozy fireplace and a raging inferno – one is nice and warm, the other will burn your house down and completely ruin the mix. If you’re wanting distortion on your vocals ABSOLUTLEY try it! Just don’t use digital distortion and make sure you gain stage properly on the way in.
We won’t even mix a track that has a large amount of clipping, because it’s just not fair to you as the client. If you’re paying for a service you should get something you’re proud of, and trying to mix distorted and poorly recorded vocals, just won’t get you to where you deserve to be. Alot of our competitors aren’t so kind, they’ll mix it, take your money, leave, and you’ll just be disappointed. So make sure before sending your music off to be mixing, you aren’t clipping. That’s all.
Clipping is just one way to destroy a vocal track. Bad mixing and mastering can be just as disastrous. Even a perfect performance can lose its shine if the post-production doesn’t do it justice. This is where Twisby Records steps in to make a difference.