

The best vocal mic is the one that suits your voice, your room and your song. It is rarely the most expensive one. If your room is quiet and treated, a condenser will usually capture the most detail. If your room is noisy or echoey, a dynamic mic is usually easier to manage. Either way, you should test two or three candidates on your own voice before you commit.
I’ve spent over 35 years around recorded vocals, and the pattern repeats: artists buy a mic from a “best of” list, record in a bedroom with a fan running, and wonder why the track sounds thin or harsh. Let’s walk through how to choose in the right order.
TL;DR
- Pick for your room first. A condenser hears reflections, fans and keyboard noise, while a dynamic is generally more focused.
- Condensers are bright and detailed and need phantom power. Dynamics are rugged and need none. Ribbons are warm, delicate and need lots of preamp gain.
- A cardioid or supercardioid pattern is the safe default for solo vocals.
- Never choose on specs alone. Run a level-matched, blind comparison of two or three mics with your own voice.
- A good mic only gets you part of the way. Placement, a pop filter and a decent mix finish the job.
Table of Contents
- Start with your room, not the price tag
- Condenser, dynamic or ribbon: what each one does to a vocal
- Pickup pattern and connection: the two specs that matter most
- Match the mic to the voice
- The best mic for vocals in a home studio
- Distance and placement change the sound as much as the mic
- How to test mics on your own voice
- Common mic-selection mistakes
- Our perspective
- Ready to take your vocal from good take to finished record?
- FAQ
- Sources
Start with your room, not the price tag
Most mic advice starts with a product list. Start with a question instead: what does the space you record in sound like?
Audio-Technica’s U.S. guide says to assess your room, purpose, setup and voice before choosing. Universal Audio makes the same point from the other side: a less-than-ideal home space favors a mic with strong off-axis rejection, while a treated room lets a sensitive condenser capture more richness and detail.
Here’s the practical version:
- Quiet, soft room (carpet, curtains, a closet full of clothes, a few panels): a condenser can show off what it does best.
- Bare walls, hard floor, a noisy street or a neighbor’s TV: a dynamic will fight the room less.
- Shared space with a fan or air conditioner: switch the noise source off while you record, whatever mic you use.
You can improve most rooms cheaply. Audio-Technica suggests rugs, curtains, soft furnishings or acoustic panels to reduce echo. If you want a fuller walkthrough of gear and setup, our honest gear recommendations for home recording cover it without the sales pitch.
Condenser, dynamic or ribbon: what each one does to a vocal
These are the three mic technologies you’ll meet. Waves describes them this way: condensers are bright, open and wide-range, dynamics are rugged and need no power, and ribbons are warm, natural and specialized.
| Condenser | Dynamic | Ribbon | |
|---|---|---|---|
| Sound | Bright, detailed, wide range | Focused, solid, less detail | Smooth, warm, darker |
| Power | Needs +48V phantom power | None | Passive: none. Active: needs phantom |
| Room sensitivity | High, picks up reflections | Lower, rejects background | Picks up front and back |
| Best for | Treated rooms, studio lead vocals | Noisy or untreated rooms, loud singers | Taming bright voices, vintage color |
| Watch out for | Harshness on bright voices | Low output on some models | Fragile, needs more gain |
The power and gain details come from MusicTech’s guide: dynamics handle high sound levels without phantom power, condensers are sensitive and need it, and passive ribbons need none while active ribbons do. RØDE’s setup guide adds that dynamics suit vocals in noisy environments because they reject background noise and are less sensitive to room reflections.
A note on ribbons
Ribbons are lovely on the right voice, but they’re a specialty choice. Recording Magazine notes they typically have a figure-eight pattern, a strong proximity effect and lower output than other types, so expect to apply more gain. If you’re recording your first EP at home, a condenser or dynamic is the simpler place to begin.
A note on low-output dynamics
Some dynamic mics are famously quiet. Audio University points out that a low-output model like the SM7B may need an interface with enough preamp gain or an inline booster. Check your interface before you fall in love with a mic.
Pickup pattern and connection: the two specs that matter most
Spec sheets are long. For vocals, two lines carry most of the weight.
Pickup pattern
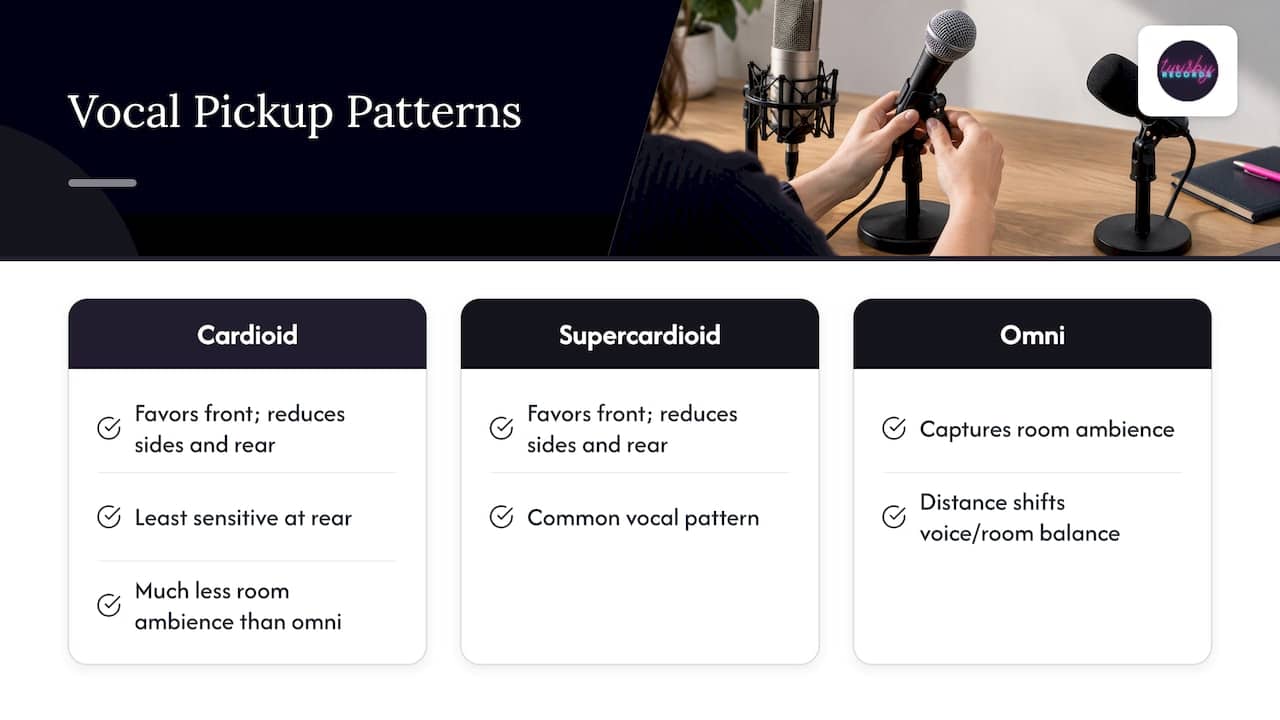
Shure’s recording guide lists operating principle, frequency response and directionality as the three main selection considerations, and its standard solo-vocal approach uses isolation and a unidirectional mic. Cardioid mics are least sensitive at the rear and pick up much less ambient sound than omnidirectional ones, which helps separate your voice from the room.
MusicTech agrees that cardioid and supercardioid are the most common patterns for vocals, since they favor sound from the front and reduce sound from the sides and rear. Omni can make sense when you actually want the room’s ambience, because moving closer or farther changes the balance of direct voice to room. That’s a deliberate choice in a good-sounding space, not a default.
USB or XLR
Audio-Technica’s guide frames it simply: USB connects straight to your computer and is simpler, while XLR usually needs an interface or mixer but offers more flexibility. If you plan to release music and grow, XLR plus an interface gives you room to upgrade one piece at a time. Condensers usually need phantom power, and most interfaces supply it.
Match the mic to the voice
There’s no mic that flatters everyone. Audio-Technica notes that a bright, detailed mic may sound too sharp on one person, while a warm mic may sound too dark on another. Recording Magazine frames the same idea as picking the right mic for the right vocal.
Use these as starting points, not rules:
- Thin or bright voice, sibilant “s” sounds: try a warmer, rounder mic, or a dynamic. A bright condenser will exaggerate the problem.
- Dark, heavy or breathy voice: a brighter condenser can add clarity and air.
- Loud, aggressive delivery (rock, rap, hype vocals): a dynamic handles high levels and keeps the room out.
- Soft, intimate delivery: a condenser in a quiet room picks up the nuance.
And don’t forget the performer. Mixonline’s quoted engineer argues the most expensive or technically impressive mic isn’t automatically best: it has to suit the production and help the vocalist deliver a better performance. If you feel good singing into a mic, you sing better. That matters more than a frequency chart.
The best mic for vocals in a home studio
Here’s how I’d narrow it down for a typical independent artist.
Situation 1: untreated bedroom, some noise. Go dynamic. Audio-Technica recommends a dynamic like the AT2040 for podcasting, streaming or untreated rooms. Make sure your interface has enough gain.
Situation 2: quiet, softened room. Go condenser. Audio-Technica points to models such as the AT2020 or AT2035 for studio vocals. Add a pop filter and keep the fan off.
Situation 3: you’re unsure. Pick one condenser and one dynamic in a price range you can live with, test both, and keep the winner. Return policies make this easy at most U.S. retailers.
Budget matters, but it’s not the first filter. If you’re planning a release, remember the mic is one line in a bigger budget with mixing, mastering, artwork and promotion. Knowing what beats cost up front helps you decide how much to put toward gear and how much to keep for everything else.

Distance and placement change the sound as much as the mic
A great mic used badly sounds worse than a modest mic used well. Start with these basics:
- Distance. Audio-Technica suggests starting roughly 6 to 12 inches from the mouth. Closer adds warmth and proximity effect. Farther sounds more natural but picks up more room. Waves suggests about 7 to 8 inches as a starting point, moving closer for intimate parts and farther back for loud passages or high notes. Even a few inches changes the tone.
- Aim. Shure recommends aiming between the nose and mouth and using slightly off-axis placement or a pop filter to reduce breath blasts and P, B, D and T sounds.
- Pop filter. Plosives are hard to remove cleanly after the fact, so prevent them at the source.
- Headphones. Closed-back headphones keep the backing track from bleeding into the mic.
For a full session workflow, see our guide to recording vocals like a pro in 15 steps, and if your files are headed to a mixer, recording vocals at home so the stems are mix-ready shows what to deliver. Choosing the right sample rate is another early setup decision worth settling.
How to test mics on your own voice
This is the step most people skip, and it’s the one that settles the argument. Recording Magazine’s vocal session guide describes the method, and it works at home with a little patience.
- Pick two or three candidates. More than three and your ears get tired.
- Set them up side by side at the same distance, each on its own track, through the same or similar preamp channels.
- Match the levels. Louder always sounds better, so even them out.
- Record the same performance. Sing a verse and a chorus. Mixonline’s report says to judge across the singer’s full dynamic range, and notes that different mics can serve verses and choruses if needed.
- Hide the labels. Rename tracks A, B and C, or have a friend do it. Recording educator Murphy, quoted by Mixonline, recommends double-blind tests because what you see biases what you hear.
- Listen in context. Play each take with the backing track, not solo. The best solo sound isn’t always the best in the mix.
- Ask the singer. Which mic made the performance feel easier?
If two mics tie, take the cheaper one and put the difference into room treatment or mixing.
Common mic-selection mistakes
- Buying for the reviews, not the room. A sensitive condenser in an echoey room records the echo.
- Ignoring gain. A low-output mic on a weak interface adds noise when you turn it up.
- Forgetting phantom power. A condenser needs it. A dynamic doesn’t.
- Skipping the pop filter. It’s cheap insurance.
- Expecting the mic to fix the performance. Pitch, timing and delivery come first. Our piece on why vocals still sound amateur covers the other usual suspects.
Our perspective
I’ve watched artists chase a “magic” mic for years while the real problem was the room, the gain staging or a performance that needed another take. The mic matters, but it’s one link in the chain.
At Twisby Records, we handle mixing and mastering with experienced engineers, real analog gear and Apple Digital Masters certification. We also do remote vocal production, so if you’re unsure whether your vocal is ready, you can send it and get personal feedback instead of guessing. Our work is personalized and collaborative, not off-the-shelf or AI-driven.
My advice: pick a sensible mic, record a clean take, and let a human ear shape it. A well-recorded vocal mixes faster, sounds better and costs you less in fixes. For what happens next, read how we approach mixing vocals and remote vocal production.
Kreg
Ready to take your vocal from good take to finished record?
Once you’ve chosen your mic and recorded your best take, the next step is getting it mixed and mastered. We offer mixing tailored to each artist, and mastering starts at a one-off $50. For artists with a release coming, we also run targeted Facebook and Instagram ad campaigns. See everything on our services page.

If you’d like in-person recording in Pittsburgh, ask us about our recording partnerships.
FAQ
Is a condenser or a dynamic mic better for vocals at home?
It depends on your room. In a quiet, treated space, a condenser captures more vocal detail. In a noisy or reflective room, a dynamic is generally less sensitive and easier to manage. If you can’t treat your room, start with a dynamic.
Do I need an audio interface for a vocal mic?
Not always. A USB mic plugs straight into your computer. An XLR mic usually needs an interface or mixer, which also supplies phantom power for condensers and gives you more flexibility as you upgrade.
How far should I sit from the mic?
A common starting point is 6 to 12 inches from your mouth. Move closer for warmth and intimacy, and back off for loud or high passages. Use a pop filter and aim slightly off-axis to tame plosives.
Does an expensive mic guarantee a better vocal?
No. The right mic suits your voice, your room and the song, and helps you perform comfortably. A mid-priced mic that fits your voice will beat a pricey one that doesn’t. A blind comparison is the fairest way to find out.
Sources
- Best Microphones for Recording Vocals, Audio-Technica
- Recording Vocals at Home #1: Mic Choice and Technique, Waves
- Which Microphone is best for my setup, RØDE
- Best microphones for vocals, MusicTech
- The Right Mic For The Right Vocal, Recording Magazine
- The Vocal Session: Choosing Mics and Gear, Recording Magazine
- Microphone Techniques for Recording, Shure
- Vocal Recording Basics, Universal Audio
- How to Pick the Right Mic to Record a Vocalist, Mixonline
- Shure SM7B vs Electro-Voice RE20, Audio University