


TL;DR:
- Mastering prepares a stereo mix for distribution by balancing tone, dynamics, and loudness standards.
- It involves EQ, compression, stereo enhancement, and limiting to ensure consistency across all playback systems.
Mastering a song is defined as the final audio processing step that prepares your stereo mix for distribution by balancing tone, controlling dynamics, and setting loudness to professional standards. This process ensures your music sounds consistent across streaming platforms, car speakers, earbuds, and club systems. The core tools are EQ, compression, stereo enhancement, and a brickwall limiter. Industry standards like LUFS targets and true peak ceilings guide every decision. Whether you are doing it yourself or working with an engineer, understanding this process puts you in control of your final sound.
How to master a song: mix preparation first
The biggest mistake musicians make is skipping proper mix preparation. Mastering cannot fix a bad mix. It can only polish a good one.
Before you touch a mastering chain, your mix needs to meet specific technical requirements:
- Headroom: Export your mix at –3 to –6 dBFS headroom with no limiter or maximizer on the master bus. This gives the mastering chain room to work without distorting.
- File format: Use 24-bit WAV files at your session’s native sample rate. This preserves the full dynamic range and fidelity of your recording.
- No clipping: Check your mix for any peaks that hit 0 dBFS. Even one clipped transient can ruin a master.
- Controlled monitoring: Quality monitoring in treated spaces or reliable headphones with correction plugins gives you accurate decisions. Untreated rooms lie to your ears.
- Clean session: Remove all unnecessary processing from the master bus before export. Let the mastering engineer, or your mastering chain, start fresh.
One detail most guides skip: the 24–48 hour break between finishing your mix and starting mastering is not optional. Ear fatigue is real. After hours of mixing, your brain compensates for imbalances you stop hearing. A full day away resets your perception and leads to better mastering decisions.
Pro Tip: Bounce a rough master immediately after mixing, then listen to it the next day on your phone speaker. The flaws you hear will tell you exactly what to fix before you start the real mastering session.
Why reference tracks matter more than your gear
Reference tracks are 2–3 professionally released songs in your genre that you use as tonal, dynamic, and loudness benchmarks during mastering. They are your most objective tool.
Here is how to use them correctly:
- Choose the right tracks. Pick 3–5 professional reference tracks in your genre with the sonic characteristics you want. A hip-hop reference and a folk reference will give you completely different targets.
- Level-match before comparing. Louder always sounds better to the human ear. Match the perceived loudness of your reference to your master before A/B listening. Otherwise, you will always think your master sounds worse.
- Use references to calibrate EQ. If your master sounds thin compared to the reference, you likely need low-mid support. If it sounds muddy, you may have too much 200–400 Hz energy.
- A/B regularly. Switch between your master and the reference every few minutes. Extended listening to one track causes ear fatigue and kills objectivity.
- Compensate for your room. References reveal what your monitoring environment hides. If every reference sounds brighter than your master, your room may be over-representing high frequencies.
Pro Tip: Import your reference tracks directly into your DAW session at the same sample rate as your master. This makes instant A/B switching effortless and keeps your comparisons accurate.
The mastering processing chain: EQ, compression, stereo enhancement, and limiting
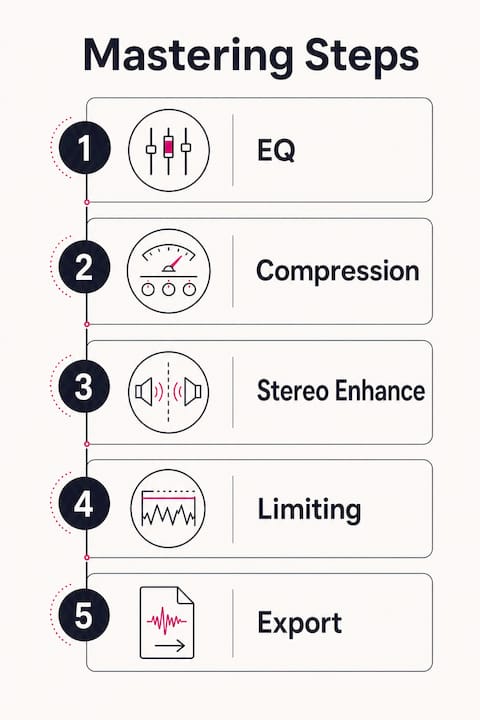
This is where the actual work happens. The professional mastering chain order is corrective EQ, bus compression, tonal EQ, stereo enhancement, and brickwall limiting. Each step builds on the last.
Corrective EQ
Start by removing problems, not adding color. Use a high-quality linear phase EQ and make surgical cuts of 1–2 dB maximum. Common targets include low-end rumble below 30 Hz, harsh resonances in the 2–5 kHz range, and muddy buildup around 200–300 Hz. The goal is a clean, balanced foundation before compression touches the signal.
Bus compression
Apply gentle bus compression with a ratio between 1.25:1 and 2:1, targeting just 1–2 dB of gain reduction. This amount of compression adds cohesion and glue without squashing the life out of your track. Use slow attack times (30–50 ms) to preserve transients and medium release times (100–200 ms) to maintain groove. If your compressor is working harder than 2 dB of reduction, your mix needs more work before mastering.
Tonal EQ and stereo enhancement
After compression, apply a second EQ pass for tonal shaping. This is where you add air, warmth, or presence. Keep boosts subtle, typically 1–2 dB on a wide shelf. Stereo enhancement comes next. Widening the stereo image adds space and dimension, but phase issues are a real risk. Check your master in mono regularly. If elements disappear or sound hollow when summed to mono, you have gone too far.
- Mid/Side processing: Use M/S EQ to control the center and sides independently. Cutting low frequencies in the sides tightens the low end without narrowing the mix.
- Mono compatibility check: Every streaming platform and many club systems sum audio to mono at some point. Your master must hold up.
- Subtle is the word: If you can clearly hear what your stereo enhancer is doing, it is probably doing too much.
Limiting and loudness targets
The limiter is your final stage. Set the true peak ceiling to –1 dBTP to prevent inter-sample peak distortion during codec encoding on streaming platforms. This is not a suggestion. Streaming codecs like AAC and Ogg Vorbis can create peaks above 0 dBFS from a signal that measures clean in your DAW.
For loudness targets, –14 LUFS integrated loudness suits most streaming platforms and preserves dynamic range. Commercial genres like pop and EDM often target –10 to –8 LUFS for a more aggressive, competitive sound. Match your target to your genre and platform.
| Processing stage | Key setting | Goal |
|---|---|---|
| Corrective EQ | Cuts of 1–2 dB max | Remove resonances and mud |
| Bus compression | 1.25:1 to 2:1 ratio, 1–2 dB GR | Add cohesion and glue |
| Tonal EQ | Boosts of 1–2 dB wide shelf | Shape tone and presence |
| Stereo enhancement | Subtle widening, mono-checked | Add space without phase issues |
| Brickwall limiter | –1 dBTP ceiling, –14 LUFS target | Control loudness, prevent distortion |
Pro Tip: After setting your limiter, export a 30-second section and play it on your phone, laptop speakers, and in your car. If it sounds good on all three, you are close. If it sounds harsh or flat on any one of them, go back and adjust.
Common mastering mistakes and how to avoid them
Most mastering problems trace back to decisions made before the mastering session even starts. Knowing the pitfalls saves you hours of frustration.
- Trying to fix a bad mix: Mastering is subtle finishing, not a corrective phase. If your mix needs extreme EQ or heavy compression to sound balanced, go back to the mixing stage. Mastering a flawed mix produces a louder, more polished version of a flawed mix.
- Over-compressing or over-limiting: Pushing your limiter hard to chase loudness kills dynamics. A flat, fatiguing master turns listeners off faster than a quiet one.
- Ignoring headroom: Exporting a mix that peaks at 0 dBFS leaves no room for mastering processing. The chain clips before it can do anything useful.
- Skipping reference tracks: Without references, you are making decisions in a vacuum. Your ears adapt to whatever they hear longest, which means your master drifts without you noticing.
- No breaks: Ear fatigue is cumulative. After 90 minutes of focused listening, your judgment degrades significantly. Step away, then return.
- Poor monitoring: An untreated room with bass buildup in the corners will cause you to cut low end that was never actually excessive. You will end up with a thin master that sounds wrong everywhere else.
Mastering should be the shortest session in your production workflow, not the longest. If you are spending hours trying to make a master sound right, the mix is the problem. Fix it there, and mastering becomes fast, focused, and effective.
The pitfall of fixing mix problems during mastering is the most common reason independent artists end up with over-processed, fatiguing releases. Treat mastering as the final 10% of the work, not the solution to the other 90%.
Key Takeaways
Mastering a song requires a clean mix with proper headroom, a disciplined processing chain, and consistent reference track comparisons to achieve professional, release-ready sound.
| Point | Details |
|---|---|
| Prepare your mix first | Export at –3 to –6 dBFS with no master bus limiter before mastering begins. |
| Use reference tracks | Compare 3–5 genre-matched professional tracks to calibrate EQ, compression, and loudness. |
| Keep processing subtle | Limit EQ boosts and cuts to 1–2 dB; use compression ratios between 1.25:1 and 2:1. |
| Set correct loudness targets | Target –14 LUFS for streaming and a –1 dBTP true peak ceiling to prevent distortion. |
| Rest your ears | Take a 24–48 hour break between mixing and mastering for accurate, objective decisions. |
What 35 years of mastering taught me about patience
Most musicians I work with come to mastering expecting it to be the exciting part. It is not. Mastering is quiet, careful, and slow. The best masters I have heard, and the best ones I have helped create at Twisbyrecords, all share one thing: restraint.
The instinct when you first open a mastering session is to do something. Add some high-end sparkle, push the limiter a little harder, widen the stereo image. Resist that. AI tools and plugins are genuinely useful starting points, but they do not know your song, your genre, or your listener. Your ears do. Trust them more than any meter or preset.
The artists who grow fastest are the ones who treat mastering as a listening exercise, not a processing exercise. They spend more time comparing and less time tweaking. They take breaks. They check their work on bad speakers on purpose. They know that a master that sounds good on a $15 Bluetooth speaker will sound great everywhere else.
One more thing: do not mix and master your own music in the same session, or even the same day. The psychological distance between mixing and mastering is as important as the technical distance. You need to hear your song as a listener, not as its creator. That shift in perspective is what separates a good master from a great one.
— Kreg
Professional mastering support from Twisbyrecords
Getting your mix to sound polished and release-ready takes skill that builds over years of practice. If you want results now without the learning curve, Twisbyrecords brings over 35 years of experience and Apple Digital Masters certification to every project.

Twisbyrecords works directly with independent artists and vocalists to deliver masters that translate across streaming platforms, playlists, and live sound systems. Every project gets personalized attention, not a template. Whether you need professional mastering services for a single, an EP, or a full album, the team at Twisbyrecords is built for the independent artist who refuses to settle for average sound.
FAQ
What does it mean to master a song?
Mastering is the final audio processing step that balances tone, controls dynamics, and sets loudness on a finished stereo mix before distribution. It prepares your music to sound consistent across all playback systems and streaming platforms.
How long does it take to master a song?
Experienced DIY engineers typically spend 45–60 minutes per track, while beginners may need 2–4 hours. Working with a professional reduces that time significantly and improves results.
What LUFS target should I use for streaming?
Target –14 LUFS integrated loudness for most streaming platforms, which preserves dynamic range. Commercial genres like pop and EDM often push to –10 to –8 LUFS for a louder, more competitive sound.
Can mastering fix a bad mix?
No. Mastering cannot correct fundamental mix problems like poor balance, phase issues, or clipping. Fix those in the mixing stage before mastering begins.
What file format should I send for mastering?
Export your mix as a 24-bit WAV file at your session’s native sample rate, with –3 to –6 dBFS of headroom and no limiter on the master bus.









