


TL;DR:
- Mixing vocals involves shaping and balancing recordings to highlight their emotional core within a song. Proper processing, gain staging, and automation are essential for clarity, with every step building on the previous to achieve a natural sound.
Mixing vocals is the process of shaping and balancing vocal recordings to sit clearly and compellingly within a music production. The vocal is the emotional center of a track, and about 7 out of 10 contemporary songs are vocal-led. That number tells you exactly where listeners focus their attention. A polished vocal mix requires a defined processing chain, disciplined gain staging, and automation that follows the performance, not just the waveform. Whether you work in Logic Pro, Pro Tools, or any other DAW, the workflow is the same.
What are the essential tools for mixing vocals?
Every vocal mix starts with the right signal chain, not the most expensive one. The stock plugins inside any major DAW are capable of producing professional results. What matters is understanding which tool does what, and placing each one in the correct order.
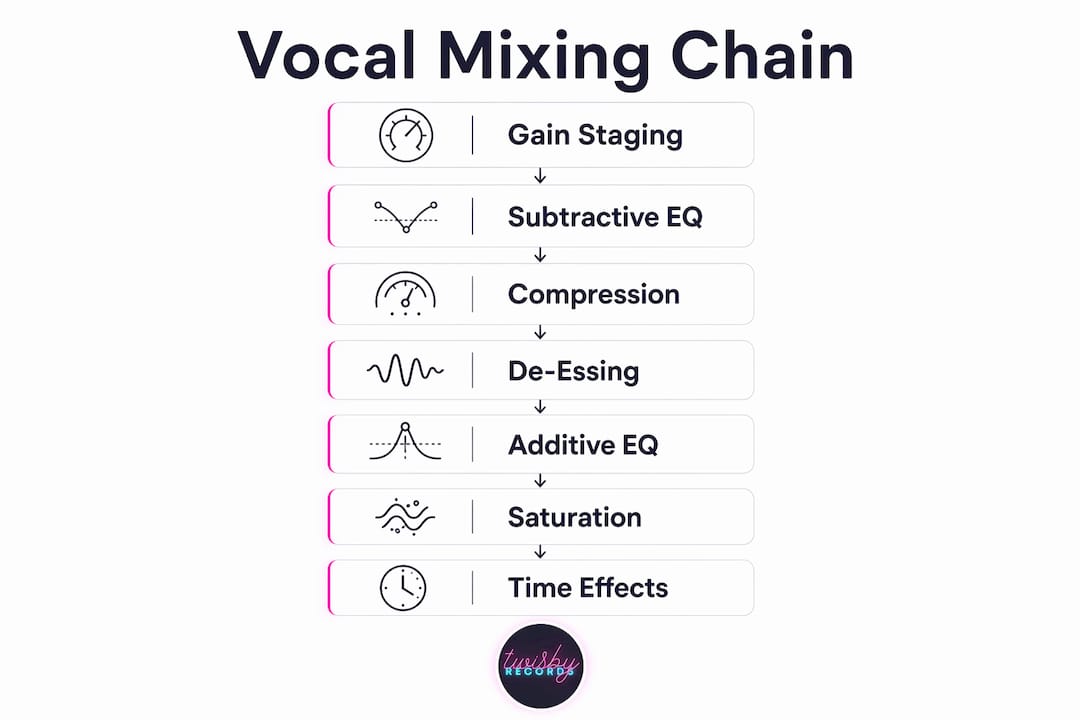
The core vocal processing chain includes these categories of tools:
- Gain staging utility — sets your input level before any processing begins
- High-pass filter and subtractive EQ — removes low-end rumble and problem frequencies
- Dynamic EQ or compressor — controls peaks and evens out the performance
- De-esser — targets harsh sibilance in the 5–8 kHz range
- Additive EQ — lifts presence and air after dynamics are controlled
- Saturation plugin — adds warmth and density without raising volume
- Reverb and delay on send channels — creates space without washing out the dry signal
Time-based effects belong on send channels, not inserts. Reverb and delay as inserts destroy clarity because you lose independent control over the wet signal. Sends let you blend the effect level precisely while keeping the dry vocal upfront.
| Tool Category | Primary Function | Placement in Chain |
|---|---|---|
| Gain staging | Set peak level to -18–-12 dBFS | First |
| Subtractive EQ | High-pass, cut mud and harshness | Second |
| Compressor (fast attack) | Reduce peaks 3–4 dB | Third |
| Compressor (slow attack) | Reduce body 2–3 dB | Fourth |
| De-esser | Tame sibilance at 5–8 kHz | Fifth |
| Additive EQ | Boost presence and air | Sixth |
| Saturation | Add warmth and density | Seventh |
| Reverb / Delay (sends) | Create depth and space | Last |
Step-by-step guide to the vocal processing chain
A professional vocal chain follows a specific order. Each step builds on the one before it. Skipping steps or reordering them creates problems that are hard to diagnose later.
-
Set your gain staging. Before adding any plugin, set your vocal track so peaks land between -18 and -12 dBFS. The standard vocal chain in 2026 begins here. This headroom protects against clipping and gives every downstream plugin room to work cleanly.
-
Apply a high-pass filter. Roll off everything below 80–120 Hz. Most vocals carry no useful information below this range. Low-end rumble competes with kick drums and bass guitars, and cutting it frees up mix space immediately.
-
Use subtractive EQ to remove problem frequencies. Cut muddiness in the 200–400 Hz range with a narrow bell curve. Tame harsh resonances in the 2–5 kHz zone where the vocal can become fatiguing. Do not boost anything yet. Listen in the context of the full mix, not with the vocal soloed. Judging EQ in isolation is misleading because the goal is balance within the full arrangement.
-
Apply two-stage compression. Use a fast-attack compressor first to catch peaks and reduce them by 3–4 dB. Follow it with a slow-attack compressor to reduce the body of the signal by 2–3 dB. Compressing in gentle stages across two compressors produces a more natural result and preserves the vocal’s dynamic character. A 4:1 ratio is a solid starting point for both.
-
De-ess after compression. Compression amplifies sibilance by evening out the signal. De-essing before compression often causes the sibilance to return once the compressor does its work. Target the 5–8 kHz range and aim for roughly 3 dB of gain reduction on problem syllables.
-
Add presence and air with additive EQ. Now that dynamics are controlled and harshness is tamed, a gentle boost around 3–5 kHz adds vocal presence. A high-shelf boost above 10 kHz adds air and openness. Keep boosts subtle, typically 2–3 dB.
-
Add saturation. Subtle saturation thickens the vocal and helps it cut through the mix without raising the fader. Tape or tube saturation emulation works well here. Push it until you hear the vocal gain density, then back off slightly.
-
Send reverb and delay to aux channels. Set a pre-delay of 15–80 ms on your reverb to create a gap between the dry vocal and the reverb tail. This gap preserves intelligibility. The dry vocal lands first, and the reverb follows without masking it.
-
Automate the vocal volume phrase by phrase. Ride the fader manually based on the lyric content and emotional delivery. This is the step most independent musicians skip, and it is the one that separates a good mix from a great one.
Pro Tip: Write out the lyric sheet and mark which phrases need to be louder or softer before you touch the fader. This keeps your automation decisions tied to the song’s meaning, not just the waveform.
How do you make vocals sit clearly in the mix?
Vocal clarity is not just about the vocal track itself. The instruments around it determine how much space the vocal has to breathe.

Volume automation riding the fader phrase by phrase is the single biggest fix for vocals that get buried. Apply automation before heavy compression, not after. When the compressor sees a more consistent input level, it works less aggressively and the vocal retains its natural dynamics.
Here are the most effective techniques for making vocals sit clearly:
- Carve the 2–5 kHz range in competing instruments. Guitars, synths, and pianos all fight for the same presence frequencies as the vocal. A narrow cut in those instruments at the vocal’s core frequency range opens a clear path. Preparing your instrumentation before the mix session makes this step faster and more effective.
- Pan backing vocals away from center. Lead vocals sit at 0 (center). Backing vocals and harmonies should be panned left and right to create width without competing with the lead. Applying slightly different processing to each side adds depth.
- Reference commercial mixes. Pull up a released track in the same genre and A/B your vocal against it. Your ears adjust to your own mix quickly. An external reference resets your perspective and reveals problems you stopped hearing.
- Avoid over-compression. A vocal that has been compressed into a flat, lifeless signal loses the dynamic variation that makes it feel human. Listeners connect with the natural rise and fall of a performance.
Pro Tip: Use a vocal layering approach for doubles and harmonies. Record a second take of the lead an octave up or down, keep it low in the mix, and it will add body without competing with the main vocal.
What are the most common vocal mixing mistakes?
Most vocal mixing problems come from a small set of repeatable errors. Knowing them in advance saves hours of troubleshooting.
- De-essing too early. Placing a de-esser before compression is the most common ordering mistake. Compression amplifies sibilance, so de-essing before it means the problem returns after the compressor engages.
- Using reverb as an insert. This is one of the fastest ways to wash out a vocal. Reverb on an insert bakes the wet signal into the track and removes your ability to control the blend. Always use sends.
- Skipping vocal automation. A static fader produces a static performance. Vocals naturally vary in intensity across phrases, and automation is how you honor that variation in the mix.
- Ignoring frequency masking. If the vocal sounds clear in solo but disappears in the full mix, another instrument is masking it. Check the 2–5 kHz range in guitars, keys, and pads first.
- Choosing plugin settings by template. Applying plugins without listening to the specific performance produces lifeless results. Every vocal is different. Every song is different. Settings from a tutorial are a starting point, not a destination.
“Mixing is about making the vocal serve the song, not just making it sound good in isolation. The best vocal mix is the one the listener never thinks about because it feels completely natural.”
Key Takeaways
A professional vocal mix requires gain staging, ordered processing, and phrase-by-phrase automation to achieve clarity, balance, and emotional impact.
| Point | Details |
|---|---|
| Gain staging comes first | Set vocal peaks to -18–-12 dBFS before adding any plugin to the chain. |
| Two-stage compression preserves dynamics | Use a fast-attack compressor for peaks, then a slow-attack compressor for body. |
| De-ess after compression | Compression amplifies sibilance, so de-essing before it causes the problem to return. |
| Reverb and delay belong on sends | Insert-based reverb destroys clarity; sends give you full control over the wet signal. |
| Automation is the biggest fix | Riding the fader phrase by phrase does more for vocal presence than any plugin. |
What I’ve learned about mixing vocals for emotional impact
After working with independent artists for over 35 years, the pattern I see most often is this: engineers reach for plugins when they should be reaching for the fader. The instinct to process is strong, especially when a vocal sounds thin or buried. But nine times out of ten, the real fix is automation.
Phrase-by-phrase volume automation guided by the lyric sheet creates a mix that feels intentional. When the lyric hits a moment of vulnerability, the vocal should feel close and intimate. When it builds to a chorus, it should feel powerful. No compressor setting does that automatically. You have to ride it yourself.
The second thing I tell every artist I work with: stop soloing the vocal when you EQ it. The vocal does not live in solo. It lives in the arrangement. What sounds too bright in solo might be exactly right when the guitars come in. What sounds muddy in solo might be providing warmth that the mix needs. Mixing vocals in context is a discipline, and it takes practice to trust what you hear in the full mix rather than in isolation.
Less processing, more listening. That is the rule I come back to every time.
— Kreg
Professional vocal mixing support from Twisbyrecords
Getting a vocal mix right takes time, trained ears, and the right environment. Twisbyrecords has spent over 35 years working with independent musicians across the United States, and the results speak for themselves.

If your vocals are not sitting where you want them, or if you are ready to take your production to the next level, Twisbyrecords offers professional mixing and mastering services built specifically for independent artists. With Apple Digital Masters certification and a personalized approach to every project, the team treats your vocal as the centerpiece it deserves to be. Reach out and hear what a professional mix can do for your music.
FAQ
What is the correct order for a vocal processing chain?
The standard order is gain staging, subtractive EQ, compression, de-essing, additive EQ, saturation, and time-based effects on send channels. Following this order prevents common problems like sibilance returning after compression.
How do I stop my vocals from getting buried in the mix?
Ride the vocal fader phrase by phrase before applying heavy compression, and carve competing frequencies in the 2–5 kHz range of instruments like guitars and synths. Volume automation is the most effective fix for vocals that disappear in a full mix.
Should I use reverb as an insert or a send?
Always use reverb and delay on send channels, never as inserts. Sends let you control the wet-to-dry ratio independently and preserve the clarity of the dry vocal signal.
What compression settings work best for vocals?
A 4:1 ratio with a fast-attack compressor reducing 3–4 dB, followed by a slow-attack compressor reducing 2–3 dB, produces a natural and controlled vocal sound. Two-stage compression preserves dynamics better than a single heavy compressor.
Why does my vocal sound harsh after EQ?
Harshness typically comes from resonances in the 2–5 kHz range that were boosted or left uncut. Apply a narrow subtractive EQ cut in that zone before adding any presence boost, and always judge the result in the context of the full mix, not in solo.









