


For most streaming releases, deliver a 24-bit WAV mastered near −14 LUFS integrated with a −1.0 dBTP true-peak ceiling. That single move prevents the platform-side turn-down that flattens overcooked masters. If you’re feeding a stricter delivery path like broadcast or Amazon priority, drop to −2.0 dBTP instead. Before you upload anywhere, run a local AAC or Opus encode and listen on your phone.
TL;DR:
- Keep your master’s true peak at minus one decibel true peak for standard streaming delivery, and minus two dBTP if your mix surpasses minus 14 LUFS or involves stricter broadcast paths.
- Aim for a loudness near minus 14 LUFS on all platforms, including Spotify, Apple Music, and YouTube, to ensure consistent normalization without unwanted volume changes or noise exposure.
- Provide your master with headroom between minus 6 to minus 10 dBFS, export at 24-bit resolution, and check phase and mono compatibility to give the mastering engineer room to refine loudness and true peak levels.
- Test your release with low-bitrate AAC, Opus, or MP3 encodes on real devices to detect issues like bass loss or stereo collapse that only appear during actual playback.
- Deliver a single, well-prepared streaming master rather than multiple versions, and incorporate true-peak limiting to prevent inter-sample clipping post-encoding.
Table of Contents
- Mixing for Streaming: Loudness and True-Peak Targets That Actually Matter
- What Should Your Mix Look Like Before It Reaches Mastering?
- Should You Deliver One Streaming Master or Several?
- How Do You Test a Master Before It Goes Live?
- What Mixing Mistakes Ruin Streaming Translation?
- A Practical Ship Checklist Before You Hit Upload
- Let Twisby Records Handle Your Streaming Master
- Sources
- FAQ
Mixing for Streaming: Loudness and True-Peak Targets That Actually Matter
Every major platform normalizes loudness, and most artists still don’t understand what that means for their master. Spotify measures your integrated loudness and turns it down if it’s hot, but in some playback modes it will also boost a quiet track back up. That second behavior is the trap. If your master is quiet and noisy, normalization exposes the noise floor instead of hiding it behind level.
Platform targets cluster tighter than most forums suggest. Spotify recommends targeting around −14 LUFS integrated with true peak at or below −1 dBTP. Apple Music uses a normalization target slightly lower than Spotify’s, and YouTube lands near −14 as well. Practical guidance across the industry now clusters around −14 LUFS with a true-peak ceiling between −1.0 and −2.0 dBTP, which makes −14 a sound universal target for music rather than a platform-by-platform guessing game.
True peak matters more than most mixers realize. Lossy codecs and digital-to-analog conversion create inter-sample peaks that a standard sample peak meter never sees, and a track that reads 0 dBFS on your DAW can clip after encoding.
- Keep true peak at −1.0 dBTP for standard streaming delivery.
- Drop to −2.0 dBTP if your master runs louder than −14 LUFS or targets stricter broadcast-style paths.
- Never mistake a hot LUFS number for a better mix. It usually just means a smaller dynamic range.
Statistic to remember: AES TD1008 guidance recommends album normalization when possible, so quieter tracks keep their relationship to loud ones across a release rather than getting squashed into uniform loudness. Chase translation and dynamics, not a louder LUFS reading.
What Should Your Mix Look Like Before It Reaches Mastering?
A mastering engineer can only work with what you give them. Hand over a mix that’s already brick walled at the master bus, and there’s no room left to shape true peak or loudness without undoing your work first.
- Leave headroom on the master bus. Aim for peaks around −6 to −10 dBFS before any mastering processing touches the file. This gives a limiter room to work transparently instead of fighting your levels.
- Export at 24-bit WAV, 44.1 to 48 kHz. This resolution keeps quantization noise low and preserves detail through the mastering chain. If a distributor specifies a different sample rate or file format, follow that spec instead of guessing.
- Check phase and mono compatibility. Sum your mix to mono and listen for canceled elements, especially on wide stereo effects and doubled vocals.
- Trim excessive sub-bass below 30 Hz. Most playback systems can’t reproduce it, and it eats headroom your limiter needs for the audible range.
- Label files clearly and embed metadata. Song title, artist, ISRC, and album info should travel with the file so distribution doesn’t stall on missing data.
Pro Tip: Send your mastering engineer a short notes file listing any known trouble spots, like a harsh cymbal crash at 2:14 or a vocal that feels buried in the chorus. That five-minute note can save two rounds of revisions.
Document your stems too, even if you’re only sending a stereo mix for now. If the mastering engineer flags something they can’t fix at the two-bus level, having stems on hand saves a full remix.
Should You Deliver One Streaming Master or Several?
One conservative master usually beats a folder full of alternates. Build a primary streaming master around −14 LUFS integrated with a −1 dBTP ceiling, and it will translate acceptably across Spotify, Apple Music, and YouTube without separate versions for each. Keep a dynamic lossless master in your archive for sync licensing, vinyl, or future formats that do not involve lossy normalization
Transparent limiting is what makes this work. A limiter that’s doing its job shouldn’t be audible as pumping or distortion; it should just quietly stop peaks from crossing your ceiling. Enable true-peak limiting on the final stage specifically, not just a standard peak limiter, since inter-sample peaks form after your limiter has already done its work if you’re only watching sample peaks.
Measure with the right tools:
- Integrated LUFS for overall loudness across the full track.
- LRA (Loudness Range) to confirm you haven’t squashed dynamics into a narrowband.
- True peak, measured with an ITU-R BS.1770-compatible meter, not a standard peak meter.
A short handoff checklist for whoever masters the track: confirm the target LUFS and dBTP, confirm file format and sample rate, confirm whether album or single-track normalization applies, and confirm what alternate deliverables (lossless, instrumental, radio edit) are actually needed.
How Do You Test a Master Before It Goes Live?
A mix that sounds great in your studio can fall apart on a phone speaker, and there’s only one way to catch that before release: test it the way listeners will actually hear it.
- Render local test encodes. Create AAC files at 128 and 256 kbps, an Opus file at 96 or 128 kbps, and an MP3 at 128 kbps. Lower bitrates reveal artifacts that a lossless file hides completely.
- Listen across real devices. Check the track on phone earbuds, laptop speakers, a Bluetooth speaker, and a car stereo if you have access to one. Each reveals different weaknesses.
- Listen specifically for translation problems. Watch for lost transients, disappearing bass, a stereo image that collapses to mono, or new harshness introduced by the encode.
- Fix and re-render if something breaks. A problem that shows up at 128 kbps AAC usually points to an EQ or limiting issue worth addressing at the mix or master stage, not something to ignore.
- Do a final check with a private or unlisted upload before the public release goes live, so you’re hearing the platform’s actual encode rather than your local file.
What Mixing Mistakes Ruin Streaming Translation?
Most translation problems trace back to a handful of repeat offenders, and every one of them has a fast fix.
- Over-compression and brickwall limiting. If your master feels lifeless after normalization, pull back limiter gain reduction or switch to a more transparent limiting algorithm instead of pushing harder for loudness.
- Too much sub-bass. Bass that disappears on phone speakers often means too much low end below 60 Hz and not enough harmonic content between 200 and 500 Hz to make bass audible on small drivers. A gentle low shelf cut plus light saturation in that midrange often fixes it.
- Phasey stereo imaging. Extreme stereo widening tools can cause mono collapse. Check your mix in mono regularly and dial back width on anything that disappears.
- Ignoring true peak entirely. Rendering with only a standard limiter and no true-peak stage invites inter-sample clipping the moment a platform encodes your file. Enable true-peak limiting and re-render.
Pro Tip: If a mix sounds thin in mono, don’t add width to fix it. Add width, and mono collapse gets worse, not better. Fix the core balance first, then adjust stereo image.
A Practical Ship Checklist Before You Hit Upload
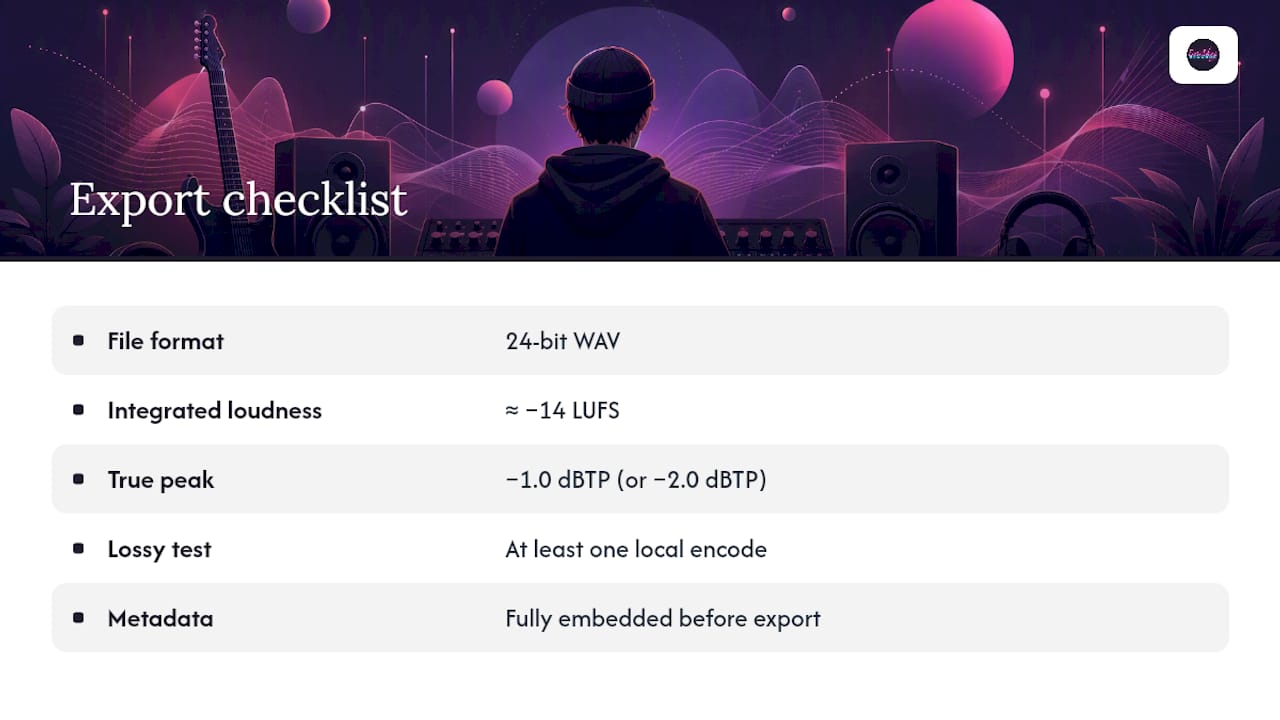
Here’s the shortlist worth pinning above your desk: 24-bit WAV file, integrated loudness near −14 LUFS, true peak at −1.0 dBTP (or −2.0 dBTP for stricter paths), at least one local lossy test encode, and metadata fully embedded before export.
Twisby Records has spent more than 35 years mastering for independent artists, and holds Apple Digital Masters certification, which means our masters meet Apple’s own technical bar for high-resolution delivery without the loudness war compromises that certification is designed to catch. That combination of longevity and a formal technical standard isn’t common in this space, and it’s exactly why so many DIY artists send us a mix instead of finishing the master themselves.
If you want a quick turnaround, tailored mastering decisions instead of a preset chain, and support built specifically around streaming-optimized deliverables, that’s the gap we fill for artists who’ve done the mix prep right but want the final translation handled by someone who does this daily.
— Kreg
Let Twisby Records Handle Your Streaming Master
Twisby Records is the alternative to guessing your way through LUFS targets and limiter settings on your own. We hold Apple Digital Masters certification, bring more than three decades of mastering experience to every project, and build a personalized chain around your specific mix rather than running it through a generic preset.
Here’s what to expect when you send us a project: a streaming master tuned near −14 LUFS with a −1 dBTP ceiling, a fast turnaround, and direct communication if something in your mix needs attention before we finalize the master. Upload your stems or stereo mix, and we handle the mixing and mastering work from there, following the same principles covered in this piece.
Once your master is ready to release, growing the audience that hears it is the next problem worth solving. Our advertising services build targeted campaigns around new releases, and pairing that with genuine promotion strategy gives a finished master somewhere to actually land. Head to our services page to get a custom quote and find out how to upload your files.
Sources
- Loudness normalization on Spotify – Spotify
- AES TD1008: Loudness normalization recommendations
- Audiolab
FAQ
What LUFS Level Should I Master to for Streaming?
Aim for integrated loudness near −14 LUFS with a true-peak ceiling of −1.0 dBTP; this single target translates well across Spotify, Apple Music, and YouTube.
Why Does My Loud Master Sound Quieter on Spotify?
Spotify normalizes playback loudness and turns down masters that exceed its target, so a track mastered far above −14 LUFS loses its intended punch once the platform adjusts the level.
Do I Need Different Masters for Different Platforms?
No. A single master built around −14 LUFS and −1 dBTP generally works across major platforms; keep a separate dynamic, lossless master in your archive for licensing or future formats.
What File Format Should I Deliver for Streaming Distribution?
Deliver a 24-bit WAV file at 44.1 to 48 kHz. This preserves detail through mastering and distribution encoding better than a compressed format.
How Do I Know if My Master Will Sound Good on Phone Speakers?
Render a local AAC or Opus test encode and listen on phone earbuds and a laptop speaker before release; problems like lost bass or stereo collapse show up immediately at lower bitrates.
Should I Master My Own Music or Hire a Professional?
If your mix already has clean headroom and you’re comfortable with true-peak metering, self-mastering can work; if you want Apple Digital Masters certified results with a fast turnaround, Twisby Records handles that process directly.









