


TL;DR:
- Using purpose-matched reference tracks helps bring your mixes closer to commercial quality by comparing tonal balance and dynamics. Level-matching and routing references around your master bus enable accurate A/B testing to identify issues quickly. Maintaining a small, well-chosen library of references and following a structured workflow accelerates mastering and improves mix translation.
The fastest way to close the gap between your mixes and commercially released music is to pick a few purpose-matched reference tracks, level-match them to your session, and A/B them during focused mix passes. Here is the shortlist to start with right now:
- Taylor Swift — “Anti-Hero” | Pop vocal layering and midrange width. Listen at 0:45–1:00 for how the lead vocal sits above dense synth layers without masking.
- Wet Leg — “Chaise Longue” | Indie vocal placement and midrange clarity. Check 0:20–0:35 for how the dry, forward vocal cuts through without sounding harsh.
- Daft Punk — “Get Lucky” (Random Access Memories) | Low-end definition and transient response. The bass guitar at 1:00–1:20 is a textbook example of punch without boom.
- Deadmau5 — “Strobe” | Electronic transient control and sub clarity. The kick/bass relationship at 2:30–2:50 shows how to keep low-end tight in dense electronic arrangements.
- Harry Styles — “Late Night Talking” | Vocal sheen and upper-midrange presence. The chorus at 0:55–1:10 demonstrates how brightness can feel warm rather than brittle.
- Bad Bunny — “WHERE SHE GOES” | Modern reggaeton low-end management and vocal presence. The drop at 1:15–1:30 shows how to keep 808s controlled while vocals stay intelligible.
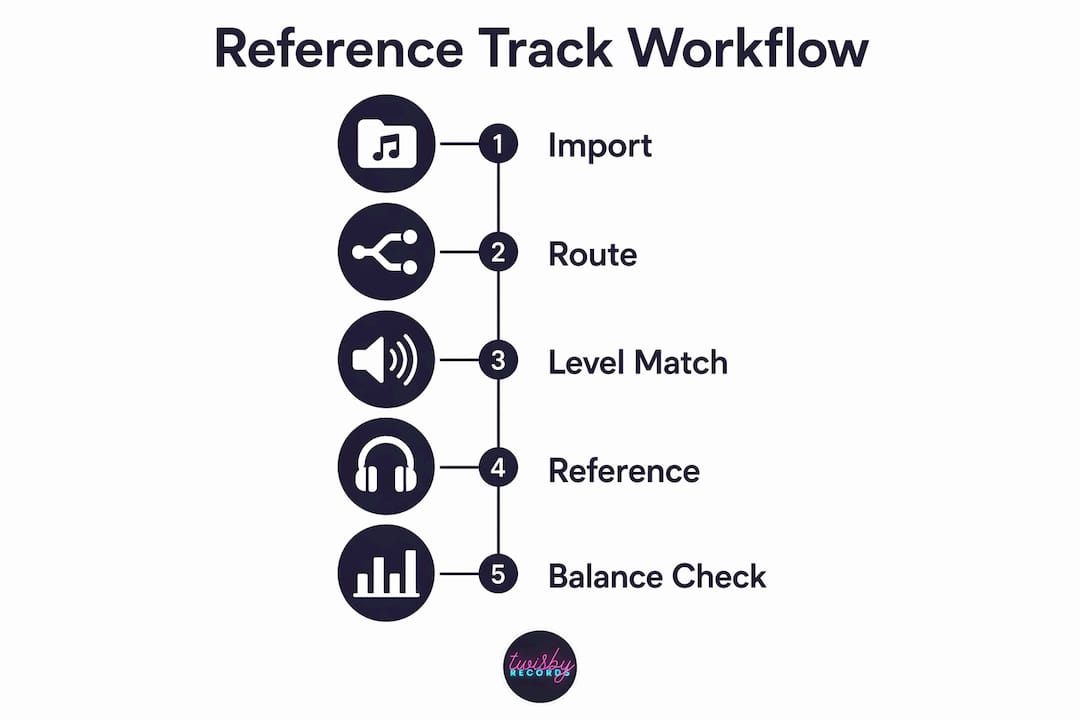
Immediate one-minute routine: Import WAV or FLAC files into a dedicated stereo track. Route that track directly to your monitor output, bypassing your master bus chain entirely. Reduce the reference’s gain until its perceived loudness matches your mix (use a LUFS meter if you have one, or match by ear at a consistent volume). Then do a 5–10 second A/B pass focused on one element at a time: kick, bass, vocal, stereo width. Make one change. Re-check.
Pro Tip: Monitor at a consistent moderate volume level during reference comparisons. Louder playback exaggerates bass and high-frequency perception, which skews every decision you make.

Twisby Records uses this exact shortlist as a starting point in client sessions. Tools like iZotope Tonal Balance Control let you visually confirm what your ears are telling you, especially useful when fatigue starts to blur the line between “close enough” and “actually there.”
Table of Contents
- What is a reference track and why does it matter for mixing?
- How were these tracks selected?
- Curated reference tracks with focused listening notes
- How do you choose reference tracks that actually help your mix?
- How do you use reference tracks in a real mixing workflow?
- Which tools make referencing faster and more accurate?
- Where do you find high-quality reference files and stems?
- Common referencing mistakes and how to fix them fast
- Key Takeaways
- The reference track habit most producers underestimate
- Twisbyrecords handles the mix when you are ready for a pro
- Useful sources
- FAQ
What is a reference track and why does it matter for mixing?
A reference track is a professionally mixed and mastered song you use as a benchmark during your own mix. You are not trying to copy it. You are using it to calibrate your ears against a known, trusted standard for tonal balance, dynamics, and spatial placement.
The distinction between mixing and mastering matters here. At mix stage, you are not chasing the reference’s loudness. A mastered commercial track typically runs 6–10 dB louder than an unmastered mix, so a direct loudness comparison is meaningless and misleading. What you are chasing is the relationship between elements: how the kick sits against the bass, how much space the vocal occupies, how wide the stereo image feels without falling apart in mono.
References also serve as a perceptual anchor. After 45 minutes of staring at a mix, your ears adapt to its imbalances and stop hearing them. Switching to a familiar reference resets that calibration instantly, revealing problems that fatigue had hidden.
- Do not compare loudness. Match levels first, every time.
- Focus on relative balance: kick vs. bass, vocal vs. instruments, stereo width.
- Check translation: does the reference hold up on earbuds and phone speakers? Your mix should too.
- Use references you know well. Familiarity makes the comparison faster and more reliable.
Pro Tip: Keep one personal “ear-tuning” track across every session — a song you know so well you can predict exactly how it should sound on your monitors. That consistency is what makes the A/B meaningful.
How were these tracks selected?
Every track on this list passed four criteria before it made the cut.
- Instrumentation match: The track’s arrangement density and instrument palette should overlap with common production types. A sparse acoustic guitar reference will not guide decisions for a dense pop or electronic mix.
- Commercial release with a professional mix and master: Each track was mixed and mastered by engineers working at the top of the field, making them reliable benchmarks for frequency balance and dynamics.
- Frequency balance that translates: The tracks hold up on multiple playback systems, from studio monitors to earbuds to car speakers, which is exactly what you need from a reference.
- Repeated engineer recommendations: These tracks appear consistently in engineer interviews and trade publications, including resources from iZotope and SonicScoop.
The vetting process cross-referenced studio usage patterns and verified lossless availability for each track. Stems and remix packs were checked where they exist.
Adapt these criteria to your project. If you are mixing acoustic folk, pull a reference with similar sparseness and natural room sound. If you are working on dense EDM, you need a reference with comparable arrangement complexity and sub-bass energy. A mismatch in instrumentation leads to misleading tonal decisions — instrumentation match is the top criterion professionals use.
Twisbyrecords applies these same criteria in every client session. The goal is always a reference set that is honest about what the mix needs, not one that flatters the current state of the session.
Curated reference tracks with focused listening notes
These six tracks cover the most common mixing challenges producers face. Each entry includes a genre tag, the specific mix problem it helps diagnose, and timed listening cues so you know exactly where to focus.
Taylor Swift — “Anti-Hero” | Pop / Synth-Pop
Why it’s useful: One of the clearest examples of pop vocal layering in modern commercial music. The vocal sits forward and wide without masking the synth layers underneath.
- 0:45–1:00: Notice how the lead vocal occupies its own frequency pocket. The synths are bright but never compete with the 2–5 kHz vocal presence range.
- 1:30–1:45 (chorus): Stereo width opens dramatically. Use this to check whether your chorus elements spread naturally or feel artificially wide.
- Use as: Vocal reference, midrange balance reference, stereo width reference.
Use the master. No official stems are publicly available, but the master is clean enough for detailed spectral comparison.
Wet Leg — “Chaise Longue” | Indie Rock / Alt
Why it’s useful: The vocal is dry, forward, and sits in the midrange without any masking from guitars. It is a reliable check for midrange clarity and vocal placement in guitar-driven mixes.
- 0:20–0:35: The vocal is almost uncomfortably present. If your vocal sounds buried by comparison, your midrange is crowded.
- 1:00–1:15: Guitar entry. Notice how the guitars fill the sides without pulling the vocal back.
- Use as: Vocal placement reference, midrange clarity check.
Daft Punk — “Get Lucky” (Random Access Memories) | Funk / Electronic Pop
Why it’s useful: Engineers consistently cite this album for low-end definition and transient clarity. The bass guitar has punch and warmth without muddying the kick.
- 1:00–1:20: The bass guitar attack is clean and defined. If your bass sounds blurry here, check your low-mid buildup around 200–300 Hz.
- 2:00–2:15: The kick and bass lock together without masking. This is the kick/bass separation benchmark.
- Use as: Low-end reference, transient response reference, kick/bass separation check.
Pro Tip: This album was recorded to analog tape and mixed with exceptional care. If you can find a lossless download, use it. The difference in transient detail over a compressed stream is audible.
Deadmau5 — “Strobe” | Progressive House / Electronic
Why it’s useful: A masterclass in electronic transient control and sub-bass management. The kick and bass coexist in a dense arrangement without fighting for space.
- 2:30–2:50: The kick attack is sharp and defined even as the bass swells underneath. Use this to check whether your sidechain compression is working or just pumping.
- 4:00–4:20 (build): The low-end energy increases without losing clarity. If your mix gets muddy during builds, this section shows what controlled low-end growth sounds like.
- Use as: Electronic low-end reference, transient control check, sidechain compression benchmark.
Harry Styles — “Late Night Talking” | Pop / Funk-Pop
Why it’s useful: The vocal sheen on this track is bright but never harsh. It demonstrates how to add high-frequency presence to a vocal without creating listener fatigue.
- 0:55–1:10 (chorus): The vocal brightness is forward and airy. Compare your vocal’s 8–12 kHz range here.
- 1:45–2:00: The backing vocals and synths fill the upper midrange without competing with the lead. Use this to check your vocal stack balance.
- Use as: Vocal sheen reference, upper-midrange balance check.
Bad Bunny — “WHERE SHE GOES” | Reggaeton / Latin Trap
Why it’s useful: Modern Latin production with aggressive low-end and a vocal that stays intelligible over heavy 808s. A strong reference for anyone working in hip-hop, trap, or reggaeton.
- 1:15–1:30 (drop): The 808 is massive but controlled. If your low end sounds flabby by comparison, check your sub-bass management below 60 Hz.
- 2:00–2:15: The vocal sits on top of a dense low-end bed without getting buried. Use this to calibrate vocal presence in bass-heavy mixes.
- Use as: Low-end management reference, vocal presence in bass-heavy mixes, modern Latin/hip-hop tonal benchmark.
For trap and hip-hop producers, trap beat mixing practices offer additional genre-specific guidance that pairs well with this reference.
How do you choose reference tracks that actually help your mix?
The wrong reference wastes time and sends you in the wrong direction. Here is a practical checklist for building a small, effective reference set for any project.
- Match instrumentation first. A dense electronic production needs a dense electronic reference. A sparse acoustic track needs a sparse acoustic reference. Mismatches in arrangement complexity lead to misleading tonal decisions.
- Match the arrangement section type. Compare chorus to chorus, verse to verse. The energy levels are too different across sections to make a fair comparison.
- Favor recent commercial masters. Production standards shift. A reference from the mid-2000s will have different loudness, compression, and high-frequency character than a 2024 release.
- Include one “tuning” track. This is a song you know so well you can predict how it sounds on any system. It is your room and headphone calibration tool, not a tonal target.
- Use 2–4 references per project. More than four and you start chasing conflicting targets. Fewer than two and you lose perspective.
When a client provides a reference, prioritize it. Their reference tells you what they hear in their head, which is more valuable than any technically perfect benchmark you might choose. Supplement with one or two of your own technical references to cover elements the client’s pick might not address (low-end, stereo width, dynamics).
Pro Tip: Rotate your reference library across sessions, but keep one personal tuning track constant. That single familiar track is your anchor across different rooms, headphones, and monitor setups.
Classifying your references by purpose speeds up the selection process. SonicScoop recommends three categories: tuning references (room/headphone calibration), element references (kick/bass, vocal), and genre references (overall vibe and tonal character). Keep a small labeled library and you can pull the right reference in under a minute.
How do you use reference tracks in a real mixing workflow?
This is the step most producers skip or do sloppily. A structured workflow produces results; random switching does not.
- Import the reference as a WAV or FLAC into a dedicated stereo track in your DAW session.
- Route it directly to your monitor output, bypassing your master bus chain. Any processing on your master bus (limiters, bus compression, EQ) will color the reference and make the comparison dishonest. Bypass master bus processing before every reference check.
- Level-match. A commercially mastered track typically runs 6–10 dB louder than an unmastered mix. Use a LUFS meter on both tracks and reduce the reference’s gain until the integrated readings match. This step is non-negotiable: loudness differences will mislead every decision you make.
- Do focused A/B passes, one element at a time. First pass: low end only. Second pass: vocal level and presence. Third pass: stereo width. Use 5–10 second listening windows, then switch immediately.
- Make one change, then re-check. Do not stack multiple adjustments before re-referencing. You will lose track of what actually moved the needle.
- Verify translation. Check mono compatibility with a correlation meter. Then listen on earbuds and phone speakers. If the reference holds up and your mix does not, you have a translation problem to solve.
| Step | Action | Tool |
|---|---|---|
| Import | WAV/FLAC on dedicated track | DAW stereo track |
| Route | Bypass master bus | Monitor output / reference bus |
| Level-match | Match integrated LUFS | LUFS meter (e.g., Youlean Loudness Meter) |
| A/B check | 5–10 sec windows, one element | A/B plugin or manual mute |
| Spectrum check | Compare frequency distribution | Spectrum analyzer (e.g., SPAN) |
| Mono check | Correlation meter | Correlation/vectorscope |
| Translation | Earbuds, phone speakers | Physical playback |
Pro Tip: Take a 10–15 minute break before your final A/B pass. Ear fatigue is real, and a rested set of ears catches problems that a tired set normalizes.
Reference at the start of your session, every 20–30 minutes during work, and before any major balance decision. That cadence keeps your ears calibrated without burning them out.
Which tools make referencing faster and more accurate?
You do not need an expensive plugin stack to reference well. But the right tools remove friction and reduce human error.
Purpose-built A/B plugins are the fastest option. They handle level-matching automatically and let you switch between your mix and multiple references with a single click. Mastering The Mix’s REFERENCE plugin is one of the most widely used in this category. It loads references, matches loudness, and displays a visual tonal comparison in one interface.
Spectrum analyzers let you see what your ears might miss, especially in the low-mid range (200–500 Hz) where mud accumulates. SPAN by Voxengo is free and accurate. FabFilter Pro-Q 4’s EQ Match feature goes further, generating a curve that shows exactly where your mix deviates from the reference.
Tonal balance and loudness tools like iZotope Tonal Balance Control give you a visual frequency comparison between your mix and a statistical target derived from commercial releases. It is not a replacement for ears, but it catches gross imbalances quickly.
| Tool category | Speed | Cost range | Best use-case |
|---|---|---|---|
| A/B plugin (e.g., REFERENCE) | Fast | Paid | Level-matched switching, tonal overlay |
| Spectrum analyzer (e.g., SPAN) | Medium | Free–paid | Frequency distribution comparison |
| Tonal balance plugin (e.g., Tonal Balance Control) | Fast | Paid (bundle) | Visual target matching, mix-stage checks |
| LUFS meter (e.g., Youlean) | Fast | Free–paid | Level-matching before A/B |
| Correlation/vectorscope | Medium | Free–paid | Mono compatibility, stereo width check |
- Free tools (SPAN, Youlean Loudness Meter free tier) cover the basics for most intermediate producers.
- A paid A/B plugin is worth the investment once you are working on client projects regularly. The time saved on level-matching alone pays for it quickly.
- iZotope and Mastering The Mix both publish detailed educational resources on how to use their tools for referencing. Start there before buying anything.
Where do you find high-quality reference files and stems?
File quality matters more than most producers realize. A lossy MP3 reference removes high-frequency detail and subtly alters the stereo image, which means you are comparing your mix to a degraded version of the original. Always use WAV or FLAC when possible.
- Your own lossless library is the best starting point. If you purchased a track as a WAV or FLAC download, use that file.
- High-res download stores (Bandcamp, Qobuz, HDtracks) often carry lossless versions of commercial releases. A one-time purchase gives you a permanent, high-quality reference file.
- Streaming at the highest available tier is acceptable when lossless is not available, but treat it as a fallback, not a preference. Tidal’s lossless tier and Apple Music’s lossless option are the most reliable streaming sources for reference work.
- Official stems and remix packs are available for some tracks through label release pages, remix contests, and artist sites. Stems let you isolate individual elements (kick, bass, vocal) for precise element-level referencing, which is especially useful for transient and phase checks.
- DAW project files occasionally surface through educational releases or artist breakdowns. When available, they offer the deepest level of referencing possible.
Pro Tip: When you find a lossless version of a track you use regularly as a reference, save it to a dedicated “Reference Library” folder organized by genre and purpose. That folder becomes one of your most valuable mixing assets over time.
For producers working in home studios, making home recordings sound professional starts with the same discipline: high-quality source files and honest comparisons.
Common referencing mistakes and how to fix them fast
Most referencing errors come down to three habits. Here is how to spot and correct them.
- Routing the reference through your master bus. Your master bus limiters and EQ will process the reference, making it sound more like your mix. The comparison becomes circular and useless. Always bypass the master bus before playing a reference.
- Comparing at unmatched loudness. Louder always sounds better. If the reference is even 1–2 dB louder than your mix, your brain will favor it regardless of actual quality. Level-match every time, without exception.
- Trying to match the reference exactly. The reference is a compass, not a template. Different arrangements require different tonal solutions. Use it to set goals for relationships between elements, not to clone another engineer’s decisions.
- Using era-mismatched references. A 1990s master has different loudness, compression, and high-frequency character than a 2024 release. Unless you are deliberately going for a vintage sound, reference against recent commercial masters.
- Comparing different section types. Chorus to verse comparisons are meaningless. The energy levels are too different. Always compare chorus to chorus, verse to verse.
Quick fixes you can apply right now:
- Level-match before every A/B pass.
- Check mono after every major balance change.
- Compare similar sections only.
- Use a spectrum analyzer to confirm what you think you hear.
Pro Tip: Schedule a 10-minute ear rest between critical A/B sessions. Perception resets faster than most producers expect, and a short break is more effective than pushing through fatigue.
Key Takeaways
Picking matched reference tracks, level-matching them, and routing them around your master bus are the three steps that separate productive referencing from wasted session time.
| Point | Details |
|---|---|
| Pick 2–4 matched references | Match instrumentation and arrangement density to your production, not just genre. |
| Level-match before every A/B | Reduce the reference gain until integrated LUFS readings match your mix; loudness bias ruins comparisons. |
| Bypass the master bus | Route references directly to your monitor output so your processing chain does not color the comparison. |
| Build a labeled reference library | Organize files by purpose (tuning, element, genre) so you can pull the right reference in under a minute. |
| Twisbyrecords for pro handoff | When you want an expert mix or master, Twisbyrecords applies these same criteria in every client session. |
The reference track habit most producers underestimate
Here is something I have seen consistently across sessions: producers who reference regularly do not just make better mixes. They make better decisions faster. The A/B habit trains your ears to hear relationships rather than isolated sounds, which is the actual skill that separates a good mix from a great one.
What surprises most people is how little the specific tracks matter compared to the discipline of the workflow. I have heard producers get excellent results with a handful of well-chosen references and a consistent A/B routine, and I have seen others with elaborate reference libraries make no progress because they skip the level-matching step or route the reference through their master bus. The workflow is the thing.
There is also a tendency to treat referencing as a finishing step, something you do when the mix feels “almost done.” That is backwards. The most useful reference checks happen early, when you are setting initial levels and making broad tonal decisions. By the time a mix feels finished, the big structural problems are already baked in. Start referencing in the first 20 minutes of a session, and you will spend far less time correcting course at the end.
One more thing: do not let the reference make you timid. The goal is not to sound like the reference. It is to sound as good as the reference, in your own way. Use it to calibrate, then trust your ears to make the artistic calls.
Twisbyrecords handles the mix when you are ready for a pro
If you have worked through this guide and want a professional set of ears on your session, Twisbyrecords offers mixing, mastering, and Apple Digital Masters certification for independent artists, fully remote and built around your project’s specific needs.

The process is straightforward. You submit your session files (prepped and organized, ideally following a mixing prep checklist), and Twisbyrecords handles the technical heavy lifting: level-matched referencing, spectral balance, translation checks across playback systems, and a master that holds up on every platform. With over 35 years of experience and Apple Digital Masters certification, the standard is commercial release quality, not “good enough for a home studio.”
Get started at Twisbyrecords.com to see current service options and request a quote. If you are not sure whether your mix is ready for mastering, the mixing engineer guide on the site walks you through exactly what to look for before you hand off a session.
Useful sources
These are the primary resources used to build this guide. Each one is worth bookmarking if you want to go deeper on any section.
Workflow and methodology guides:
- iZotope: How to use references like a pro mixing engineer — Covers perceptual anchoring, A/B cadence, and tool recommendations.
- iZotope: 13 tips for using references while mixing — Practical tips including lossless file guidance.
- iZotope: 4 popular mixing reference tracks and why they work — Track-specific analysis and visual tool recommendations.
- Mastering.com: How to use references when mixing — Instrumentation match criteria and selection methodology.
- SonicScoop: My top reference mixes and how to choose your own — Reference library categorization and familiarity argument.
- Beat Kitchen: Reference tracks — The most important tool in mixing — Level-matching steps and master bus bypass guidance.
Plugin and tool documentation:
- Mastering The Mix REFERENCE plugin — Purpose-built A/B and tonal comparison.
- iZotope Tonal Balance Control — Visual frequency distribution against commercial targets.
- Voxengo SPAN — Free spectrum analyzer.
- Youlean Loudness Meter — Free LUFS metering.
| Resource type | Name | Best for |
|---|---|---|
| Workflow guide | iZotope community blog | A/B cadence, perceptual anchoring |
| Selection criteria | Mastering.com | Instrumentation match rules |
| Library building | SonicScoop | Categorized reference library setup |
| Routing and level-match | Beat Kitchen | Step-by-step session workflow |
| Visual analysis | iZotope Tonal Balance Control | Frequency distribution checks |
| Free spectrum analysis | Voxengo SPAN | Budget-friendly spectral comparison |
FAQ
What makes a good reference track for mixing?
A good reference matches your production’s instrumentation density, arrangement complexity, and release era. Familiarity matters too: a track you know well lets you predict how it should translate across playback systems, making the A/B comparison faster and more reliable.
How do you level-match a reference track in your DAW?
Import the reference as a WAV or FLAC on a dedicated track, route it to bypass your master bus, then reduce its gain until the integrated LUFS readings match your mix. A commercially mastered track typically needs 6–10 dB of attenuation to match an unmastered mix.
How many reference tracks should you use per session?
Two to four references per project is the practical range. More than four creates conflicting targets; fewer than two limits your perspective. Include at least one instrumentation match and one personal tuning track you know across all sessions.
Can you use Spotify or Apple Music streams as references?
Streaming is acceptable as a fallback, but lossless files (WAV or FLAC) are always preferred. Lossy compression removes high-frequency detail and can alter the stereo image, which makes precise spectral and transient comparisons less reliable.
When should you hire a professional mixing engineer instead of referencing yourself?
If your mixes consistently fail to translate across playback systems after applying a structured referencing workflow, that is a strong signal that the room, the monitoring chain, or the mix decisions themselves need a professional assessment. Twisbyrecords offers remote mixing and mastering with Apple Digital Masters certification for independent artists who want a commercial-quality result without guessing.









