


Prepare vocals for tuning by delivering clean, dry, well-gained comped takes with the correct key already set, then place your tuner early in the chain and start with conservative retune settings. Retune Speed is the control that decides whether correction sounds natural or obviously processed, so get the takes right before you ever touch it. Treat tuning as a finishing step, not a fix for a messy session.
TL;DR:
- Proper gain staging and capturing dry, noise-free vocals in a consistent distance are essential to ensure reliable pitch correction results.
- The Retune Speed setting significantly influences whether tuning sounds natural or robotic, with slower speeds around 50-100 ms preferred for transparency.
- Place the tuner early in the plugin chain, after noise reduction and de-essing, to avoid tracking errors caused by EQ or compression artifacts.
- Tuning should be applied after selecting the best performance take, properly timing and aligning it, and before adjusting doubles or harmonies for tonal consistency.
- Conservative de-essing and breath control should be finalized after tuning to prevent harmonic shifts that can mislead pitch detection.
Table of Contents
- Pre-Tuning Checklist: Steps to Complete Before You Open a Tuner
- Recording and Gain Staging: Mic Choice, Placement, and Capture Habits
- Noise Removal and Audio Repair Workflow Before Tuning
- Comping and Timing Alignment: Lock Your Lead Before Tuning Stacks
- Sibilance, Breaths, and De-Essing Tactics That Keep Tuners Honest
- Key, Scale, Vocal Range, and Tuner Settings to Set Before You Tune
- Plugin Order, Routing, and Session Hygiene for Reliable Tuning
- Verify and Audition: Catching Over-Correction Before It Ships
- Twisby Records’ Notes on Vocal Prep (From Kreg)
- When to Tune Aggressively vs. Preserve Human Variation
- How Twisby Records Can Help You Prepare and Tune Vocals
- FAQ
- Sources
- Primary Plugin Docs and Authoritative Tutorials
Pre-Tuning Checklist: Steps to Complete Before You Open a Tuner
We treat this checklist as the gate before any pitch plugin loads. Skipping a step here means fighting artifacts later, when they’re harder to isolate and fix.
- Comp the lead vocal first. Confirm your best take or combine the strongest phrases from several takes into one lead performance before tuning touches the file.
- Check your gain staging. Ensure levels are set properly with no clipping anywhere in the take.
- Keep the signal dry. Work from a version with no reverb, delay, or creative effects so the tuner reads the actual pitch, not a smeared reflection of it.
- Remove noise and repair audio. Pull out hum, clicks, and floor noise, and apply de-essing only where sibilance is genuinely a problem.
- Verify the song’s key and scale. Confirm this against a reference pitch or chord chart so the tuner isn’t guessing.
- Duplicate a dry backup stem. Do this before any destructive edits so you can always return to the untouched take.
Each step removes a variable that could otherwise confuse pitch detection. A vocal that passes through this checklist clean gives your tuner an honest signal to work with, which means fewer artifacts and less manual cleanup on the back end. Our own recording checklist walks through the capture side of this in more depth.
Recording and Gain Staging: Mic Choice, Placement, and Capture Habits
Pitch correction starts long before you load a plugin. It starts at the microphone.
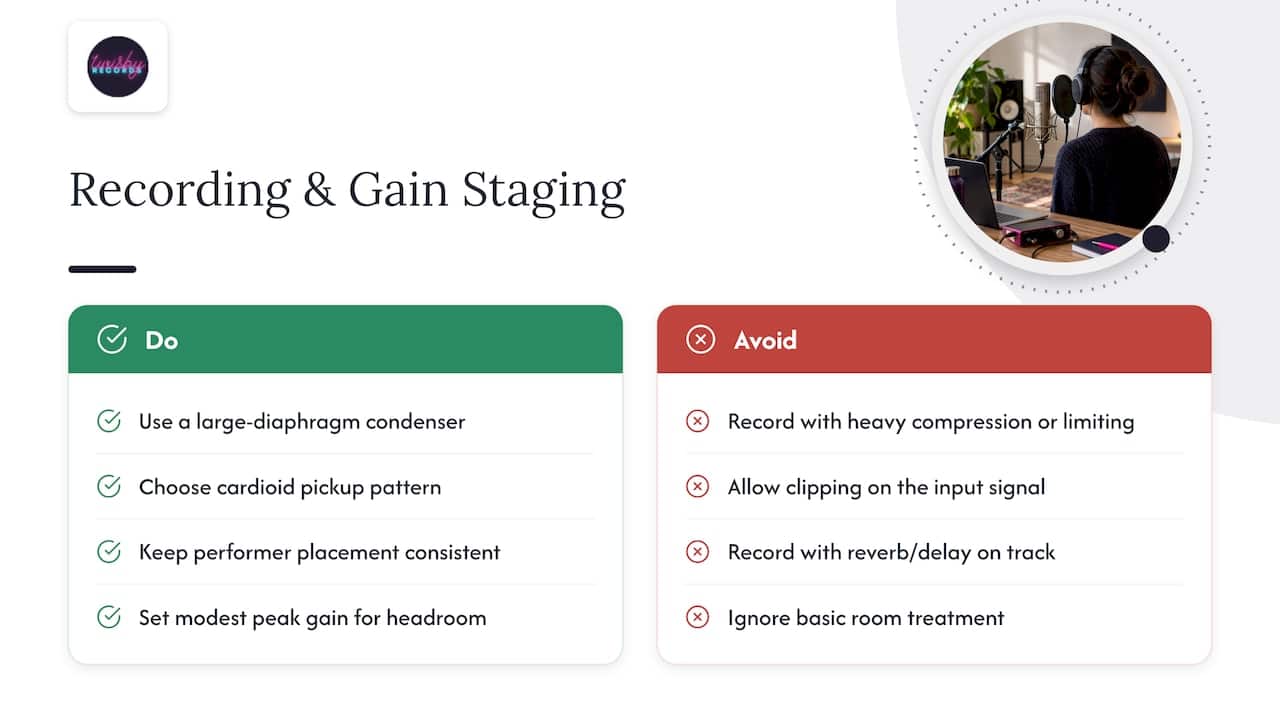
A large-diaphragm condenser is the standard choice for most lead vocals because it captures detail in the fundamental frequencies that tuners rely on to track pitch accurately. Cardioid pickup patterns help reject room reflections and bleed from monitors or headphones, both of which confuse pitch-tracking algorithms. Whatever mic you choose, consistency matters more than brand. A singer who drifts six inches closer on a loud chorus changes the proximity effect and tonal balance mid-take, and that shift can read as a pitch anomaly to some tuning engines even though the note itself never moved.
Gain staging deserves the same attention. Set your interface or preamp so peaks land at a modest level, allowing headroom for dynamic performances without risking clipping. A clipped waveform doesn’t just sound harsh, it also distorts the harmonic content a tuner uses to identify the fundamental frequency, which can cause mist racked notes that no amount of plugin tweaking will fully correct. Avoid heavy compression or limiting during capture too. A limiter slammed on the input might protect you from clipping, but it also flattens transients and can mask the natural pitch contour of a phrase, making correction less precise later.
Record dry whenever possible. Reverb and delay add tails that overlap consecutive notes, and that overlap is exactly what trips up a pitch detector trying to isolate one note from the next. If your singer wants reverb to perform comfortably, route it to a headphone monitor mix only and keep the recorded track clean.
Basic room treatment helps too. You don’t need a professional vocal booth, but packing blankets, foam panels, or even a closet full of clothes can tame early reflections enough to keep the fundamental frequency clear rather than smeared by room bounce. Our guide to recording vocals at home covers budget-friendly ways to get a cleaner capture without a treated studio.
Noise Removal and Audio Repair Workflow Before Tuning
Noise doesn’t just sound bad, it actively breaks pitch detection. A tuner reading a vocal with hum, clicks, or heavy floor noise underneath it can lock onto the wrong frequency entirely, producing corrections that sound worse than the original problem.
Work through repairs in order of severity:
- Fix broad, consistent issues first. Hum, hiss, and steady floor noise respond well to spectral repair tools like iZotope RX, which can isolate and reduce unwanted frequency content without touching the vocal itself.
- Handle isolated clicks and pops manually. A single click from a mouth noise or cable issue is often faster to fix with a manual edit and a short fade than with a broad noise-reduction pass.
- Treat mouth noises and breaths individually. Attenuate rather than delete them when they sit close to the vocal, since total silence can sound unnatural in context.
- Preview every repair in context. Solo listening can hide problems that become obvious once the fix sits against the full mix.
Be conservative with reduction settings. Aggressive noise reduction can smear the very harmonic content a tuner needs to track pitch accurately, trading one problem for another. A light touch that removes the obvious noise floor without processing the vocal itself gives the tuner a cleaner signal and keeps you from chasing new artifacts introduced by over-repair.
Comping and Timing Alignment: Lock Your Lead Before Tuning Stacks
Picking takes for pitch accuracy alone is a common mistake. iZotope’s guide to vocal editing makes the point directly: prioritize takes that preserve emotion and phrasing, because slight timing and pitch issues are usually fixable later, but a flat, technically perfect performance with no feeling in it is much harder to rescue.
- Select takes for performance first. Choose the phrases and full takes that best capture the emotional intent of the song, not simply the ones with the fewest pitch wobbles.
- Crossfade transitions carefully. Use tight, short crossfades when comping between takes to avoid clicks or phase issues that could register as artifacts once the file moves into a tuning editor.
- Trim silence and dead air. Clean edges prevent noise floor jumps from confusing a tuner that’s trying to track a continuous phrase.
- Align timing slips before tuning. Small rhythmic drifts are easier to fix with simple nudges now than after pitch correction has already shaped the waveform.
- Tune the lead vocal completely before touching doubles or harmonies. Finalize the main performance first, then apply matching settings to background layers so the whole stack sits together tonally.
This order matters because background vocals are judged against the lead, not the other way around. If you tune doubles before the lead is finished, you’ll likely redo that work once the lead’s pitch or timing shifts. Our piece on time-aligning vocals walks through the point-by-point process in more detail, and our guide to layering vocals explains why stack order matters once you move past the lead.
Sibilance, Breaths, and De-Essing Tactics That Keep Tuners Honest
Sibilance typically lives in the 5 to 10 kHz range, and it’s tempting to de-ess heavily before tuning to clean things up. Resist that urge. Aggressive de-essing doesn’t just dull an “s” or “t” sound, it can shift the vowel energy around it, and a pitch detector reading that altered harmonic balance may track the note incorrectly.
Start conservative. A light de-esser that targets only the problem frequencies, applied in moderation, is almost always enough before tuning. Save heavier sibilance control for after pitch correction is finished, once you can hear the final tonal balance clearly.
Breaths need a similar judgment call. Some breaths carry useful phrasing information and should stay, just quieter. Others are distracting and can be pulled down significantly or automated out entirely. Breath-control plug-ins or simple volume automation both work. What matters is deciding deliberately rather than running a blanket noise gate that treats every breath the same way, since an overly aggressive gate can clip the start of the next phrase and create a new pitch-tracking problem exactly where you don’t want one.
Key, Scale, Vocal Range, and Tuner Settings to Set Before You Tune
Before any correction happens, confirm the song’s key and scale. AutoTune’s guide to pitch correction recommends using an automatic key-detection tool like AutoKey when you’re unsure, since an incorrect key setting will cause a tuner to pull notes toward the wrong pitches entirely. Switch to Chromatic mode only as a diagnostic step, to confirm whether a note that sounds “off” is actually a key error rather than a performance issue.
From there, work through these settings in order:
- Vocal Range or Input Type. Choosing Soprano, Alto/Tenor, Baritone/Bass, or an Auto Detect option helps the plugin narrow its search window and track pitch more accurately for that voice.
- Retune Speed. This is the parameter that defines how a correction sounds.
- Pitch Tracking sensitivity. For breathy or noisy vocals, the AutoTune Advanced FAQ suggests a starting value around 20 to 30, raised further for noisy live recordings.
- Flex Tune, Humanize, and Preserve Vibrato. Where your plugin offers them, these controls let correction follow natural pitch drift and vibrato rather than snapping every note to a flat, static target.
Retune Speed ranges from roughly 50 to 100+ milliseconds for a very natural, nearly undetectable correction, down to 20 to 30 milliseconds as a balanced studio starting point, and as low as 0 to 5 milliseconds for the hard, classic Auto-Tune effect. That range is the single biggest creative decision in the entire tuning process, and it’s worth testing a few values on a verse before committing to one for the whole song.
Plugin Order, Routing, and Session Hygiene for Reliable Tuning
Where you place a tuner in your plugin chain changes what it hears. AutoTune’s best-practices documentation recommends placing light de-essing and noise removal before the tuner, then saving compression, EQ, reverb, and delay for after correction. A tuner fed a signal that’s already been EQ’d or compressed hard has a distorted picture of the true pitch and dynamics, which can produce less accurate tracking.
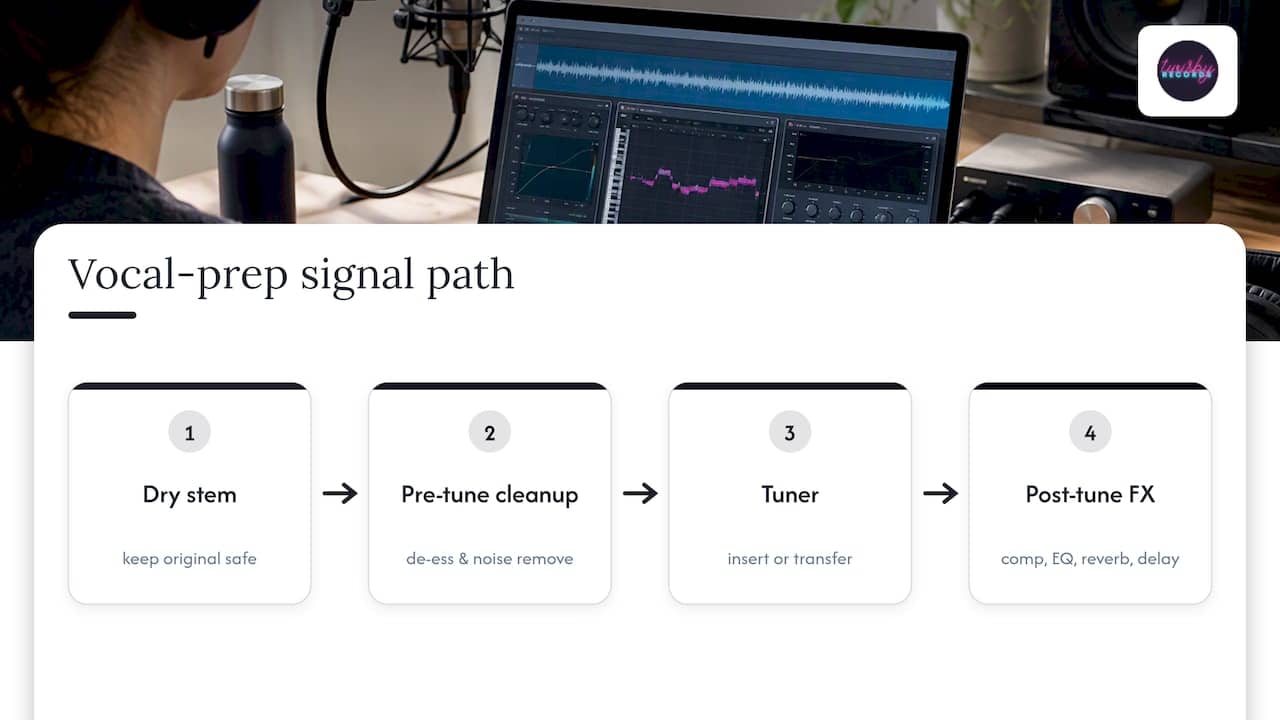
Work from a dry stem whenever possible, and keep your original, untouched recording safe in case you need to start over. If you’re using a transfer-based editor like Melodyne rather than a real-time insert, understand that any processing sitting on the track before the transfer gets baked into what the editor analyzes. Bounce a dry version first if your session has pre-inserted effects you can’t easily bypass. Our comparison of Melodyne and AutoTune breaks down when each approach makes more sense for a given session.
For vocal stacks, route and tune the lead first. Once it’s finished, print that tuning and use it as the tonal reference for doubles and harmonies, so the whole stack locks together instead of drifting against each other.
Verify and Audition: Catching Over-Correction Before It Ships
Once tuning is applied, audition it properly before moving on with intentional listening to catch subtle issues.
- A/B the tuned version against the original, both soloed and inside the full mix, since artifacts that are obvious in isolation sometimes disappear in context and vice versa.
- Watch pitch and spectrogram displays for sudden jumps or unnatural-looking corrections that your ear might miss on a quick pass.
- Listen for formant shifts. A “chipmunk” or robotic quality usually means the retune speed is too fast or a formant-preserve control needs adjusting.
- Count the problem notes. If a large portion of a phrase needs heavy correction, consider re-recording that line or using detailed graph edits in Melodyne rather than leaning harder on Auto Mode.
Pro Tip: Solo the vocal and slowly ride the Retune Speed knob up and down while playing through the trickiest phrase. The point where it stops sounding robotic but still corrects the pitch is your real setting, not whatever preset you started with.
A focused listening pass like this, done deliberately rather than as background noise while you work on something else, catches problems that casual monitoring misses.
Twisby Records’ Notes on Vocal Prep (From Kreg)
We’ve spent more than 35 years mixing and mastering vocals for independent artists, and the pattern holds across genres: sessions that arrive clean and well-organized tune faster and sound more natural than sessions that need repair work before anyone can even open a tuner. Our mastering work carries Apple Digital Masters certification, which depends on exactly the kind of clean gain staging and dry capture this checklist covers.
When we handle vocal production, our typical deliverables include a dry backup stem, a tuned and comped lead stem, and session notes covering settings used, so the project stays editable down the line. Turnaround depends on the scope of the material, but we prioritize quick collaboration. Kreg has guided independent artists through this preparation process, and the posts linked throughout this guide reflect the workflow we use every day.
When to Tune Aggressively vs. Preserve Human Variation
Here’s where most guides go quiet: tuning settings aren’t really a technical decision, they’re a genre decision disguised as one. Pop and R&B production has normalized a tighter, more processed vocal sound, and audiences in those genres often expect it. Singer-songwriter material and live-feel recordings tend to reward the opposite: audible breath, slight pitch drift on a held note, the texture that makes a performance feel human rather than manufactured.
The mistake we see most often isn’t choosing the wrong Retune Speed. It’s defaulting to one setting for every song regardless of what the material is asking for. When a performance carries real emotional weight, a fast surgical fix on one problem note almost always beats a blanket correction pass, and sometimes the honest answer is to re-record the line instead of tuning around it.
— Kreg
How Twisby Records Can Help You Prepare and Tune Vocals
If you’d rather hand this process to engineers who do it daily, we offer mixing and vocal production built around exactly the workflow covered here: comping, gain correction, noise repair, and tuning handled by a person, not a preset.

Our deliverables typically include:
- A dry backup stem for future edits or re-mixes.
- A fully tuned and comped lead vocal stem.
- Session notes documenting key, scale, and retune settings used.
- A finished mix ready for mastering with Apple Digital Masters certification.
If your vocal takes need more than editing can fix, we also offer in-person recording partnerships in Pittsburgh. And once your track is mixed and mastered, our advertising packages help get it in front of listeners who are actually looking for music like yours. Reach out through our services page to talk through what your session needs.
FAQ
How do you train your voice to sing in tune?
Consistent practice with a reference pitch, such as a piano or tuning app, combined with ear-training exercises like interval matching, builds pitch accuracy over time. Recording yourself regularly and comparing takes against a reference also helps identify specific notes or intervals that need more focused work.
What is the hardest song to sing?
There’s no single agreed-upon answer, since difficulty depends on vocal range, breath control, and stylistic demands rather than one fixed standard. Songs with extreme range, rapid runs, or sustained high notes are commonly cited as challenging across different vocal styles.
At what age do singers typically peak vocally?
Vocal maturity varies significantly by individual, training, and genre, so there’s no universal peak age. Many singers maintain strong technical ability well into later decades with consistent training and vocal health practices.
Is Taylor Swift’s voice autotuned?
Pitch correction tools are commonly used across mainstream pop and country production to polish vocal takes, and this is standard industry practice rather than something specific to one artist. Without a named, sourced statement confirming specific usage on a particular recording, it’s not something we can state as fact.
Sources
- AutoTune – Best Practices
- Pitch Correction: The Complete Guide to Tuning Vocals | AutoTune
- Vocal Editing 101: Your Guide to High Quality Vocals
- Melodyne 5 audio algorithms and detection guidance
Primary Plugin Docs and Authoritative Tutorials
- AutoTune – Best Practices
- Pitch Correction: The Complete Guide to Tuning Vocals | AutoTune
- Vocal Editing 101: Your Guide to High Quality Vocals
- Melodyne 5 audio algorithms and detection guidance
- AutoTune Advanced FAQ









