


Aim for mix peaks generally between about -6 and -3 dBFS with true peaks staying below -1 dBTP, and take one action right now: pull off any master-bus limiter or maximizer and lower your master fader until your loudest moment sits within that range. The exact number can shift a little depending on genre and what your mastering engineer asks for, but that range covers almost every situation.
TL;DR:
- Sample meters can miss intersample spikes, so check true peak after setting levels and after format conversion, keeping it below -1 dBTP.
- Export WAV or AIFF files with 24 bit depth at your project’s native sample rate, and use dither only when reducing to 16 bits.
- Choose the conservative end of the peak range for dense arrangements or stem deliveries, and preserve each stem’s relative level when exporting.
- Check gain at each point in the signal chain, since clipping inside a track or bus remains in the file and cannot be repaired downstream.
Table of Contents
- What Headroom Is and How to Spot It in Your DAW
- Why Headroom Matters for Mastering and What Engineers Do With It
- The -6 dB Rule: When It Helps, When It’s Unnecessarily Strict
- Sample Peak vs True Peak: How to Measure Real Peaks and Why It Matters
- Practical Targets and Step-by-Step: How to Create Headroom in Your Mix
- Export Settings and a Short Technical Checklist for Sending Mixes to Mastering
- Common Mistakes, Quick Fixes, and Troubleshooting Before You Export
- Twisby Records’ Delivery Standards and Kreg’s Practitioner Notes
- How Headroom Affects Dynamic Range and Overall Sound Quality
- Differences in Headroom Requirements Across Genres and Production Styles
- How to Communicate Headroom Requirements Effectively to Mastering Engineers
- Impact of Headroom on Compatibility With Playback Systems and Streaming Platforms
- When to DIY Your Master and When to Hire Twisby Records
- Twisby Records Mastering Services: How to Get Started
- FAQ
- Sources
What Headroom Is and How to Spot It in Your DAW
Headroom is the gap between your loudest peak and 0 dBFS, the point where digital audio clips. Every sample above that ceiling gets chopped off, producing a harsh, flat-topped waveform that no amount of mastering can undo. Leaving space below that ceiling is what gives a mastering engineer (or you, if you are mastering your own track) room to work.
You will run into three kinds of meters while mixing, and they measure different things:
- Peak meters show the single highest sample at any instant, which is what tells you how close you are to clipping.
- RMS meters average level over time, giving a rough sense of perceived loudness but missing short transients.
- LUFS meters measure perceived loudness the way human ears experience it, which is the standard streaming platforms use for normalization.
A kick drum hit might spike a peak meter to -2 dBFS for a few milliseconds while the RMS meter sits comfortably at -18 dBFS. That gap between the instant peak and the average level is exactly the kind of headroom a mastering engineer relies on.
One more thing worth locking in before you export: work and deliver in 24-bit, not 16-bit. The extra bit depth lowers the noise floor and gives processing like EQ and compression more resolution to work with, which matters most during the mastering stage. Apple’s own delivery documentation recommends 24-bit source files for exactly this reason, something we will come back to later.
Why Headroom Matters for Mastering and What Engineers Do With It
A mastering engineer is not just making your track louder. Several processing steps need room to move, and a mix that is already slammed against 0 dBFS leaves none.
- EQ boosts can push certain frequencies higher, and without headroom, that boost clips instantly.
- Mid/side processing widens or narrows the stereo image, which can raise peak levels in ways you would not predict from a stereo peak meter alone.
- Multiband compression shapes dynamics in specific frequency ranges, often adding gain back into the signal.
- Final limiting is the last gain stage before loudness normalization, and it needs intact transients to work with, not a signal that is already flattened.
When headroom runs out, something has to give. The usual compromise is reduced dynamic range: the engineer either backs off every move they wanted to make, or pushes forward anyway and introduces digital distortion. Neither outcome serves the song.
A practitioner checklist for mix prep recommends keeping peaks between -6 dBFS and -3 dBFS before export, specifically so mastering engineers have that processing room without risking clipping. That guidance lines up with what most working engineers ask for, and Apple’s Digital Masters documentation echoes it from the other direction: Apple warns that audible clipping introduced before encoding can disqualify a track from Apple Digital Masters certification entirely.
The -6 dB Rule: When It Helps, When It’s Unnecessarily Strict
The “-6 dB headroom” rule has been passed around mixing forums for years, and like most rules of thumb, it started as a simple safety margin rather than a technical requirement. Early digital workstations had less reliable metering and smaller margins for error, so engineers settled on a number conservative enough to protect against surprises.
That conservatism still earns its place in a few situations:
- Dense mixes with a lot of simultaneous elements tend to build up peaks in unpredictable ways, so extra headroom catches surprises.
- Stems delivered for mastering need consistent relative levels across files, and a wider margin reduces the risk of any one stem clipping.
- Less experienced engineers benefit from a bigger buffer while they are still building an ear for gain staging.
Outside those cases, -6 dB is often stricter than necessary. A -3 dBFS peak target, paired with a true-peak check below -1 dBTP, gives plenty of protection for most clean, well-balanced mixes without unnecessarily squashing the apparent level of your rough mix reference. The Pro Audio Files breaks down why this fixed number gets treated as gospel when the real goal is simpler: leave enough room that nothing clips and the mastering engineer still has control over the final loudness curve.
Sample Peak vs True Peak: How to Measure Real Peaks and Why It Matters
Your DAW’s stock peak meter usually measures sample peaks, the level at each individual digital sample. That is not the same as the actual peak level of the reconstructed analog waveform once it passes through a digital-to-analog converter or a streaming encoder. Between two samples, the real waveform can briefly spike higher than either sample shows, a phenomenon called inter-sample clipping.
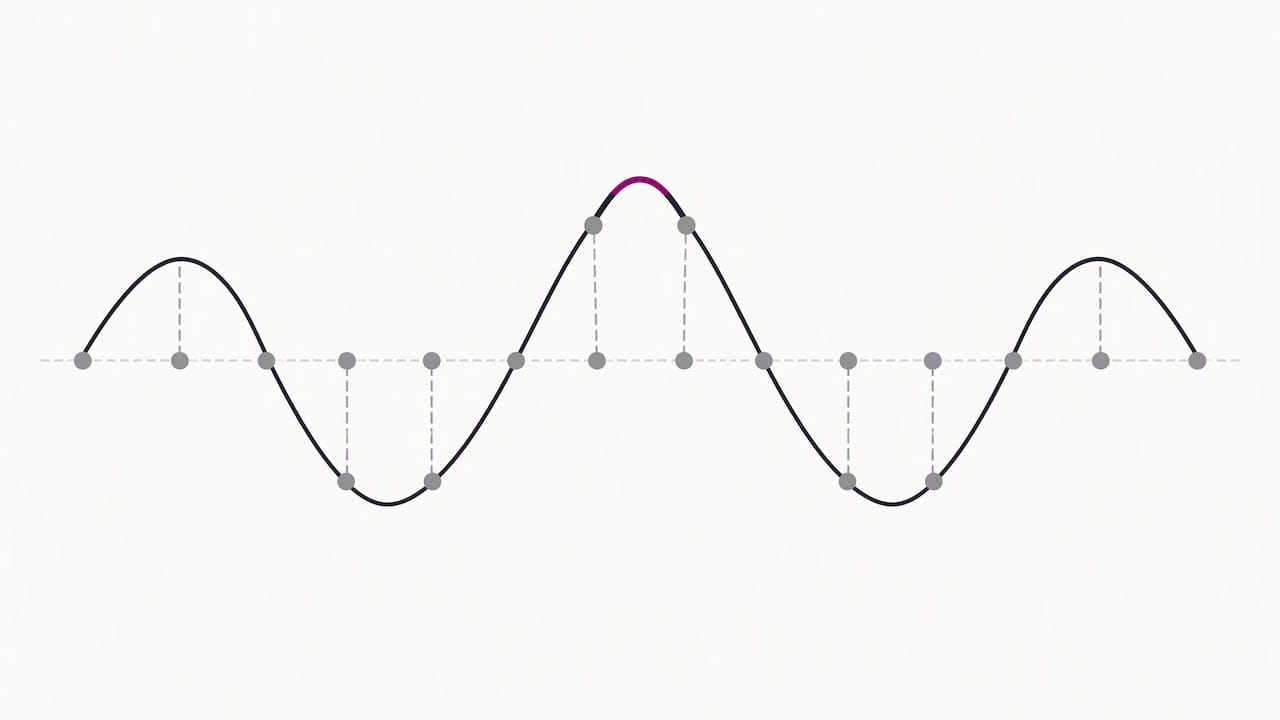
True-peak meters solve this by oversampling or interpolating the signal to estimate those in-between peaks. ITU-R BS.1770 recommends true-peak metering using exactly this kind of oversampling, specifically to catch overloads that sample-peak meters miss entirely.
A safe target is keeping true peaks below -1 dBTP. Here is how to check it without guessing:
- Use your DAW’s built-in loudness meter if it has a true-peak mode (most modern DAWs do).
- Insert a dedicated true-peak plugin on your master bus as a final check before export.
- Re-check after any bounce or format conversion, since encoding to a lossy format can introduce new peaks that were not there in your WAV file.
Pro Tip: Run your true-peak check after you have already set your sample peaks, not before. It is the last safety net, not the first step.
Practical Targets and Step-by-Step: How to Create Headroom in Your Mix
Building headroom into a mix is a short, repeatable process, not a creative decision you need to agonize over.
- Find your loudest section. Play through the full track and watch your peak meter during the densest moment, usually the final chorus or drop.
- Bypass or remove master-bus processing. Take off limiters, maximizers, and any clipper plugins sitting on the master channel.
- Lower the master fader, not individual tracks, until your loudest peak sits between -6 and -3 dBFS.
- Re-check your true peak after that adjustment, since gain changes can shift where inter-sample peaks land.
- Export at 24-bit once both numbers check out.
Adjusting the master fader instead of trimming individual tracks matters because it preserves the balance you already mixed. Pulling down a vocal here and a bass there to “find headroom” changes the relationships between elements that took you hours to dial in. Keeping stem levels intact and adjusting globally is the move that protects your mix balance.
If you are using creative master-bus processing on purpose, such as a touch of bus compression for glue, document it. A short text note or a label in the filename telling your mastering engineer what is on the bus and why saves a round of back-and-forth.
| Step | Target | Why it matters |
|---|---|---|
| Find loudest peak | Identify the moment, not the average | Sets your reference point for gain staging |
| Remove limiting | No limiter/maximizer on master bus | Preserves transients the mastering engineer needs |
| Set peak level | -6 to -3 dBFS | Leaves room for EQ, compression, and limiting |
| Check true peak | Below -1 dBTP | Avoids inter-sample clipping on streaming encoders |
| Export | 24-bit WAV/AIFF | Preserves resolution for processing |
Export Settings and a Short Technical Checklist for Sending Mixes to Mastering
Getting the headroom right does not help much if the file itself is in the wrong format. A few export decisions matter as much as the peak level.
| Setting | Recommendation |
|---|---|
| File format | WAV or AIFF |
| Bit depth | 24-bit |
| Sample rate | Match your project’s native rate |
| Dither | Off, unless you are reducing bit depth (24-bit to 16-bit) |
| Master bus processing | Removed, or clearly labeled if intentional |
Avoid exporting MP3 or AAC as a mastering deliverable. Lossy compression discards data permanently, and a mastering engineer working from a compressed file is mastering a degraded version of your mix no matter how good their processing chain is.
A short checklist covers the rest:
- Label your files clearly, including song title, version, and date, so nothing gets mixed up in a folder of alternate mixes.
- Include stems if your mastering engineer requested them, keeping relative levels between stems untouched.
- Add a reference track if you have one, so the engineer understands the tonal and loudness target you are chasing.
- Skip silence padding unless specifically asked for it, since most engineers trim it themselves.
Both Apple’s delivery guidance and general mix-prep practice agree on 24-bit WAV or AIFF as the baseline, and it is worth treating that as non-negotiable rather than optional.
Common Mistakes, Quick Fixes, and Troubleshooting Before You Export
A handful of errors show up again and again in files sent for mastering, and most are easy to catch once you know where to look.
- Hidden clipping inside the signal chain, often from a gain plugin or an overloaded bus before the master fader, even when the final output meter looks clean.
- Exporting as MP3 or AAC by accident when the export window defaulted to a lossy format.
- A forgotten limiter left active on the master bus from a reference mix, quietly capping your dynamics without you noticing.
The fixes are just as direct. Reset your master bus to a blank slate and rebuild only what is intentional. Gain-stage from the source, not just the output, checking levels at each stage of your signal chain rather than only at the final meter. Run a true-peak meter as your last check before bouncing, and confirm the export format reads WAV or AIFF at 24-bit before you commit.
If you find clipping buried inside the mix itself rather than just at the output, that usually means reopening the session rather than trying to fix it with a quick re-export; a clipped waveform baked into a track cannot be undone downstream. For anyone fighting this on vocal takes specifically, this breakdown of vocal clipping covers where it tends to creep in. Once your export checks out, play it back on a phone speaker, a car system, and headphones if you can. Problems that are invisible on studio monitors sometimes announce themselves immediately on cheaper playback systems.
Pro Tip: Keep a “pre-master” bounce saved separately from your working session file. If a mastering engineer asks for a re-export with different headroom, you will not need to reconstruct your mix from scratch.
Twisby Records’ Delivery Standards and Kreg’s Practitioner Notes
We ask clients for 24-bit WAV or AIFF files with peaks in the -6 to -3 dBFS range and no master-bus limiting unless it is intentional and labeled. We pay close attention to source fidelity on every delivery, reflecting the standards of Apple Digital Masters certification, which depends on files that meet Apple’s clipping and resolution requirements.
In practice, that means a client’s rough mix tells us a lot before we even open the session. Clean headroom and an unprocessed master bus usually mean a faster turnaround, because we are not spending the first pass undoing decisions the mix already locked in. If you want the fuller walkthrough of our process end to end, our practical mastering guide covers what happens after a file lands with us, and why skipping a second set of ears on your own mix can be a harder habit to break than expected.
How Headroom Affects Dynamic Range and Overall Sound Quality
Headroom and dynamic range are connected but not identical. Headroom is the space below the clipping ceiling, while dynamic range is the distance between your quietest and loudest moments. A mix with plenty of headroom still gives a mastering engineer the choice of how much dynamic range to preserve or compress.
When a mix arrives with no headroom left, that choice disappears. The engineer either has to accept a flattened, already-limited signal or ask for a new bounce, because there is no room to apply compression or limiting without immediately clipping. The result of mastering a hot, headroom-starved mix is usually a louder-sounding but more fatiguing track, since the dynamic contrast between verses and choruses gets ironed out before the mastering stage even begins.
Preserving headroom through the mix stage is what keeps that choice available. It is not about making your rough mix sound quiet. It is about making sure the loudest and quietest parts of your song can still be shaped deliberately rather than accidentally, which is ultimately what separates a mix that sounds controlled from one that just sounds loud.
Differences in Headroom Requirements Across Genres and Production Styles
A dense electronic or hip-hop mix with heavy bus saturation and layered low end tends to build up peaks faster than a sparse acoustic or jazz recording, simply because more simultaneous elements are competing for the same headroom. That favors leaning toward the more conservative end of the -6 to -3 dBFS range.
A mix built around a handful of instruments, like a folk or singer-songwriter track, usually has more natural space between its peaks and its average level already, so -3 dBFS is often plenty.
Genre also shapes how aggressively a mastering engineer will push loudness and limiting afterward. A pop or EDM master aimed at a high perceived loudness still needs the same clean headroom going in, because the limiting happens at the mastering stage, not before. Classical and acoustic genres, where dynamic range itself is part of the artistic intent, benefit from mix engineers being even more careful not to compress away the contrast between loud and quiet passages before the file ever reaches mastering.
The target peak range barely changes across genres. What changes is how much margin you want to build in given how dense and compressed your specific arrangement already is.
How to Communicate Headroom Requirements Effectively to Mastering Engineers
The simplest way to avoid back-and-forth is to say exactly what you did before you hit export. A short note with your file, even a few lines in an email or an order form, should cover your peak level, whether you left any processing active on the master bus, and whether you are delivering stems alongside a stereo mix.
If you intentionally used a touch of bus compression or saturation for creative reasons, say so and explain why, rather than leaving a mastering engineer to guess whether it was deliberate or an oversight. The same goes for reference tracks: naming one or two songs whose tone or loudness you are chasing gives an engineer a target faster than a paragraph of description would.
When in doubt, ask what format the engineer prefers before you bounce anything. Some ask for extra headroom on stems specifically, others want a fully mixed stereo file with minimal instruction. Our mix bus processing guide walks through what is usually safe to leave on versus what is worth removing before that conversation even starts.
Impact of Headroom on Compatibility With Playback Systems and Streaming Platforms
Streaming platforms normalize loudness to their own targets, which means a mix slammed to 0 dBFS with no headroom does not actually sound louder on Spotify or Apple Music than a properly mastered track with healthy dynamics. It just sounds flatter, and the clipping baked in at export stays audible on every system that plays it back.
Inter-sample peaks that sample-peak meters miss can turn into audible distortion once a streaming service encodes your file to a lossy format for delivery, which is exactly what true-peak metering is designed to catch before that happens. Keeping true peaks below -1 dBTP protects you from that specific failure mode across platforms.
Playback systems vary widely too. A mix that sounds fine on studio monitors can reveal clipping or harshness on a phone speaker or in a car, where the frequency response and dynamic handling are completely different. Headroom protects against distortion regardless of playback system, while loudness normalization handles the perceived volume differences between platforms on its own. We cover the streaming side of this in more detail in our guide to mixing for streaming and in what independent artists need to know about mastering for Spotify.
When to DIY Your Master and When to Hire Twisby Records
If your mix has unresolved clipping, inconsistent loudness between sections, or you are aiming for a commercial release across multiple platforms, that is usually the point where hiring a mastering engineer earns its cost. A second, trained set of ears catches balance issues you have stopped hearing after weeks on the same project.
When clients come to us, we typically ask for a clean 24-bit stereo mix with healthy headroom, any stems if relevant, and a reference track or two. From there we handle the tonal shaping, loudness, and final export.
If you are still deciding, a quick self-check helps: can you say with confidence that your master bus is clean, your true peak is under -1 dBTP, and your loudness is consistent from verse to chorus? If any of those feel uncertain, that uncertainty is usually the signal. Our breakdown on whether mastering can fix a bad mix is worth reading either way.
— Kreg
Twisby Records Mastering Services: How to Get Started
Once your headroom and export settings are dialed in, sending your mix to us for mastering is a short step. Our mastering process incorporates Apple Digital Masters standards, and we also offer mixing and advertising services for artists who want support beyond just the audio.

When you request a quote, include your 24-bit WAV or AIFF file, a note on your peak levels if you have them, and any reference tracks that capture the tone or loudness you are after. If your mix still needs balance work before mastering, our mixing and mastering bundle covers both stages in one engagement. For artists further along who also want distribution support after their track is mastered, a partner resource like Playlist Pilot’s guide to audio analysis and playlist matching is worth a look once your master is locked.
Ready to send a file our way? Start with a mastering quote and we will take it from there.
FAQ
What is meant by the term headroom?
Headroom is the space between your loudest peak level and 0 dBFS, the point at which digital audio clips. Leaving headroom means your mix never reaches that ceiling, giving a mastering engineer room to apply EQ, compression, and limiting without distortion.
How hard is mastering music?
Mastering requires trained ears, calibrated monitoring, and experience judging loudness, tone, and dynamics across playback systems, which makes it genuinely difficult to do well without practice. Many independent artists mix their own tracks but hire a mastering engineer specifically because the final loudness and tonal decisions benefit from a fresh, trained perspective.
Is it better to mix quiet or loud?
Mixing with healthy headroom, generally peaks around -6 to -3 dBFS, is safer than mixing hot against 0 dBFS, since a loud mix risks hidden clipping and leaves no room for mastering processing. A quieter mix with intact dynamics gives you and your mastering engineer more control over the final result.
How many dB should a mastered song be?
Streaming platforms normalize loudness to their own targets, so a mastered song’s exact loudness depends on the platform rather than one universal number. For true peak specifically, ITU guidance supports keeping masters below -1 dBTP to avoid inter-sample clipping regardless of the platform’s loudness target.
Sources
- The 6 dB headroom mastering myth explained | The Pro Audio Files
- Apple Video and Audio Asset Guide — Apple Digital Masters guidance
- Recommendation ITU-R BS.1770-5 — Algorithms to measure audio programme loudness and true-peak audio level
- How to prepare your mix for mastering — Best Audio Producer









